 跳到内容

Small shops often have a surprisingly complex lighting brief. The entrance needs to attract attention, merchandise must read clearly, fitting rooms need comfortable light, and staff must be able to close without leaving every luminaire on. A control system can solve these problems, but adding a network to a tiny store is not automatically better than a few well-placed standalone sensors. The right choice depends on the number of zones, how frequently scenes change, who maintains the store, and whether the site is part of a larger estate.
This guide compares standalone and networked retail lighting controls from a buyer’s perspective. It focuses on questions to put in a specification and checks to make during a mock-up. It is not a substitute for a site-specific electrical design or local code review.
The featured boutique image is a concept illustration, not a photograph of an LCB installation.
Start with the store’s jobs, not a controller brochure
Before choosing technology, write down what the lights must do during a normal day. A small boutique may need a bright opening scene, a warmer browsing scene, a balanced fitting-room scene, a cleaning scene and a safe after-hours route. A convenience store may have longer operating hours and a stronger need for entrance, shelf and checkout consistency. A salon may prioritise task colour and glare more than dramatic transitions.
List the users as well as the scenes. Will a manager select a preset each morning? Can staff override an automatic dimming event? Does the cleaning team need a simple switch? If a sensor fails, can customers and staff still see and move safely? These operational questions often expose the real difference between a tidy control scheme and one that looks impressive only in a demonstration.
What standalone controls can do well
A standalone occupancy sensor, photocell, local dimmer or scene switch can be an efficient answer when a store has a few independent areas. For example, a stockroom sensor may switch or dim its own lights, while display lighting follows a scheduled or manually selected scene. There is less system infrastructure to coordinate, and a replacement is usually easier to understand if the original design is documented.
Standalone does not mean crude. A compatible dimmable driver and a properly selected local control can deliver useful low-light settings, smooth transitions and straightforward staff operation. But the exact behaviour depends on the complete combination of sensor, control, driver and luminaire. A catalogue statement that each component is “dimmable” does not establish that the assembled system behaves well at the lowest useful level.
The limitations show up when many devices must act together. One sensor might turn off a display while a customer stands still. Separate timers may drift out of step. Staff may have to visit several switches to reach one evening scene. If the business has five branches, inconsistent local settings can produce noticeably different stores. These are signs to consider grouping, a central scene control or a networked system.
What a networked lighting control system adds
A networked lighting control system can link luminaires, sensors, schedules and user interfaces so they operate as coordinated zones. It may support central scene changes, monitoring and repeatable settings across multiple shops. Some systems allow remote support, but that benefit depends on the chosen product, connectivity, permissions and service arrangement—not on the word “networked” alone.
The buyer should ask what continues to work when the network, gateway or internet connection is unavailable. Lighting should not become unusable because a remote dashboard cannot be reached. Clarify whether schedules are stored locally, whether manual switches continue to respond, and who owns configuration files and passwords. A project handover should include enough information for a future contractor to maintain the installation.
Networked controls also create commissioning work. Devices must be identified, grouped, named and tested. A small store with only a few stable zones may not recover that complexity in practical value. Conversely, a store with frequent merchandising changes, multiple operating scenes and a growing chain may benefit from it. Compare total ownership effort, not only the equipment price.
Map the zones before comparing quotations
Draw a basic floor plan and mark the entrance, promotional display, central aisles, perimeter merchandise, fitting rooms, checkout and stockroom. Not every area needs a separate circuit or control group, but each has a different task. Decide which zones must dim together and which must remain independent. Note sightlines: if adjacent zones change abruptly, customers may see an awkward patchwork even when each individual zone meets its target.
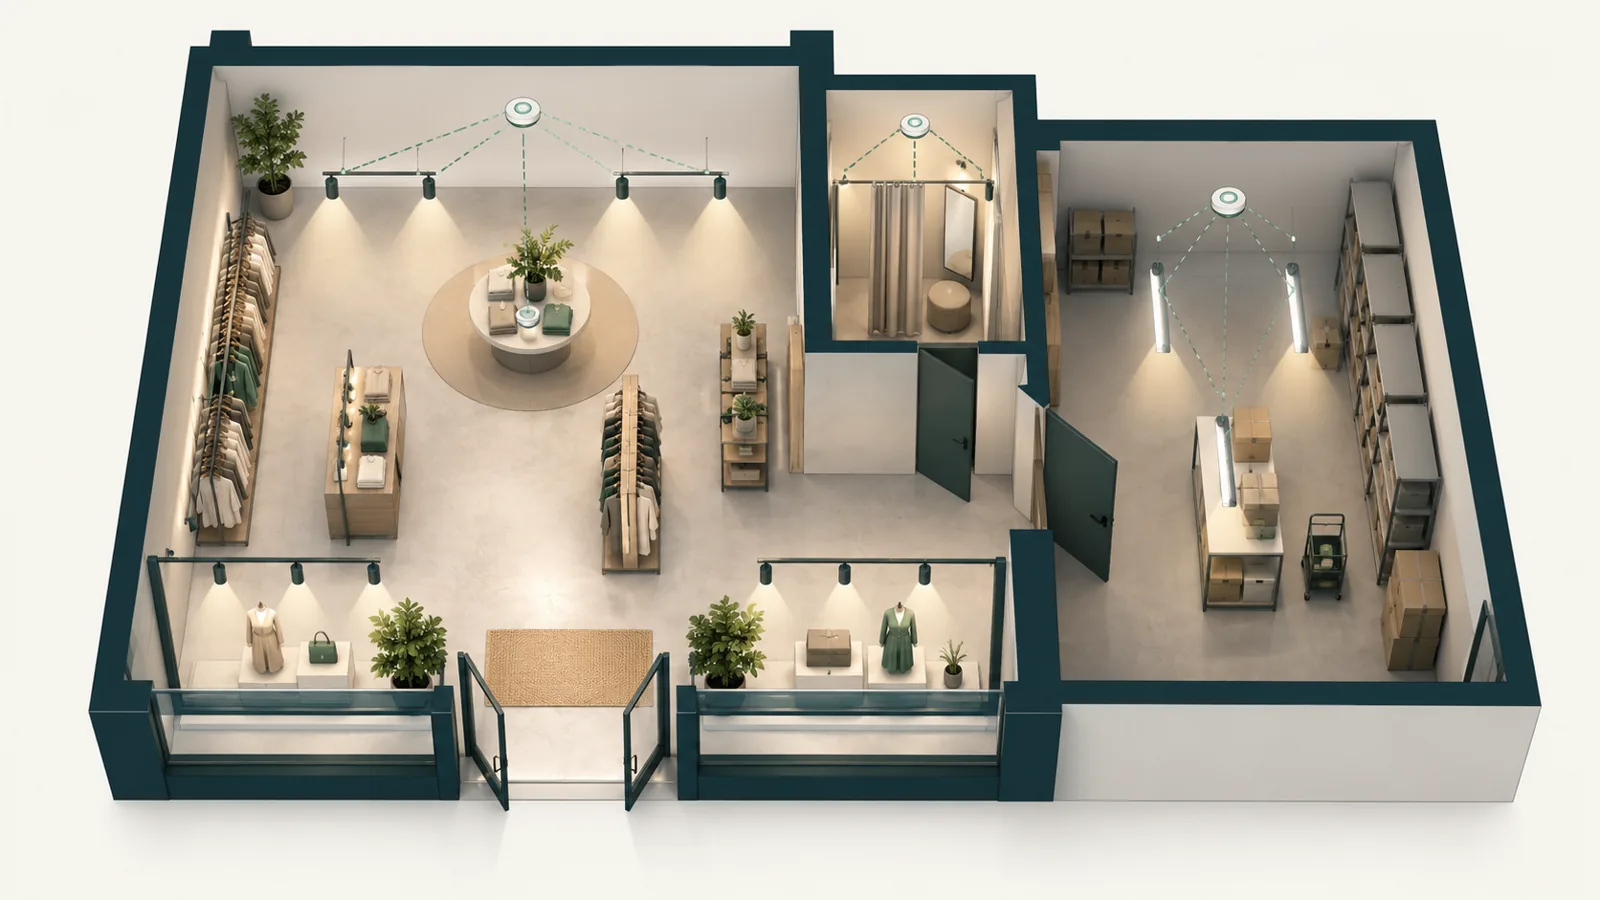
Use the plan to test the proposed sensors. A fitting-room presence sensor should not extinguish the light while a customer is nearly motionless. A stockroom sensor should detect the relevant aisle, not activity through a doorway. A daylight sensor belongs where it sees representative daylight, not directly under a spotlight or in a shadow that never matches the sales floor. The specific mounting position and sensitivity need verification on site.
It can help to mark “always available” lighting separately from promotional light. A strong retail scene is not useful if the route to an exit or the point-of-sale task becomes uncomfortable. The design team must also check the applicable emergency-lighting and electrical requirements; these are project- and jurisdiction-specific and should not be improvised from a blog diagram.
Use a practical decision matrix
Standalone controls usually make sense when the store has a small number of stable zones, simple schedules, limited maintenance resources and no strong need for remote estate-wide changes. Networked controls become more compelling when zones interact, scenes change frequently, reporting has a defined user, or multiple branches need consistent settings. A hybrid arrangement can be sensible: local sensor control for a stockroom with a grouped scene system on the sales floor.
Ask each bidder to explain the proposed approach in plain language: what a staff member presses to open, what happens during a quiet hour, how cleaning mode is selected, and what happens after a power interruption. If two bids use different control architectures, compare them against the same use cases. A lower-cost system that forces staff to override sensors all day may be a poor bargain; an expensive network nobody uses is not a better one.
Check the luminaire and driver interface
Controls cannot correct a poorly matched lighting product. Confirm the driver interface, the dimming range relevant to the intended scenes, and whether the luminaire stays visually stable at low output. Ask about minimum load or device limits where applicable, and test the actual driver and controller combination. For communication protocols, confirm what is standardised, what is proprietary and which component stores the settings.
For track spotlights, also consider whether a future display reconfiguration will move or add fittings. Track hardware, control grouping and the electrical arrangement have to be planned together. A product such as the COB LED track spotlight can support a focused merchandise layer, while adjustable LED linear track lighting can support more continuous shelf or aisle light. Those product families should be chosen for the physical display task first; controls then need to match the selected configuration.
If flicker complaints are possible, ask for evidence at the dimmed operating points, not just at full output. Our flicker and driver guide explains why a single percentage is not enough to describe every visual or camera-related issue. For a multi-site rollout, document the exact approved driver and control pairing so replacements do not quietly change the result.
Mock up the real scenes with real merchandise
A lighting mock-up should use representative products, finishes and display heights. Test the entrance in daylight and after dark. Inspect reflective packaging, dark fabric, skin tones in the fitting room, and the checkout screen. Walk through the store at normal pace, then stand still in a fitting room or stockroom to see whether the sensors behave appropriately. Ask staff to operate the scene switch without coaching.
Photographs help record impressions, but a phone camera may change exposure and white balance between shots. Keep written observations and, where needed, measured readings. Record the control settings used during each review. A mock-up that is not documented is hard to reproduce across future branches or after a replacement. The retail lighting mock-up checklist offers a useful way to formalise acceptance.
When comparing versions, change one variable at a time: perhaps the display beam, then the general-light level, then the scene transition. Otherwise it becomes difficult to know why one option feels better. Include the person who will run the shop, not only the design team. They will notice whether controls are understandable at opening, closing and during busy trading hours.
Commissioning and handover decide long-term value
At handover, ask for a zone map, circuit or device schedule, scene list, control instructions, passwords where relevant, warranty contacts and a record of the installed driver and luminaire versions. Test sensor behaviour, overrides, power restoration, time schedules and any daylight response. Confirm who is allowed to change settings and how changes are backed up.
A short staff guide can be more valuable than a long technical manual. It should answer: “How do I open?”, “How do I change the display scene?”, “How do I switch on cleaning mode?”, and “Who do I call if the lights behave unexpectedly?” For a chain, keep a master version so local changes do not accumulate unnoticed. Our commercial lighting commissioning checklist provides a broader project handover framework.
Common mistakes to avoid
- Buying a network because it sounds future-proof without defining who will use its data.
- Putting the whole sales floor on one sensor and losing useful display light when traffic is quiet.
- Choosing a dimming interface before testing the exact luminaire-driver-control combination.
- Forgetting fitting-room occupancy behaviour and the customer experience of a sudden dimming event.
- Ignoring cleaning, restocking and after-hours staff scenes.
- Accepting a controls handover with no zone map, settings record or support contact.
Questions for an RFQ
When you request quotes, provide a floor plan and the required scenes. Ask suppliers to identify each control zone, the proposed sensor position, the driver interface and the expected failure behaviour. Request a plain-language explanation of how the store opens, closes and overrides automation. Ask whether configuration changes require proprietary tools or a subscription, whether settings can be backed up, and what is included in commissioning and training.
Also state whether this is one shop or a prototype for more stores. A single-site design can be optimised for simplicity; a rollout needs repeatability, spare-part discipline and consistent visual standards. If OEM or project-specific luminaire changes are involved, lock an approved sample before bulk production and verify the control interface alongside optics and finish. Explore our commercial LED product ranges for candidate fixtures, then match controls to the actual application.
Frequently asked questions
Are standalone sensors always cheaper?
Not necessarily. Equipment may be simpler, but compare installation, adjustment, staff time and maintenance over the expected life. A few independent zones can be economical; a complicated set of uncoordinated devices can become hard to operate.
Do networked controls need internet access?
Some functions may, but the answer depends on the product architecture. Ask which functions work locally during an internet or gateway outage and test that behaviour before acceptance.
Can we add networked control later?
Sometimes, but only if the selected drivers, wiring, physical access and control platform support the planned upgrade. Get that route documented in the initial specification rather than assuming every dimmable luminaire is upgrade-ready.
Where should a small shop use occupancy sensors?
Back-of-house spaces are often the simplest starting point. Customer-facing areas need careful testing because still shoppers, fitting-room use and brand presentation may make aggressive automatic shutoff unsuitable.
What should the store manager receive at handover?
A short scene and override guide, labelled zone map, support contact and a way to report faults. The maintenance team should also receive driver and device references, configuration records and commissioning test results.
For a project-specific lighting and control discussion, send LCB your floor plan, display priorities, operating hours and desired scenes. We can help align the luminaire selection with the intended customer experience and clarify which details need local controls expertise.
