 跳到内容

Quick answer: Light the customer and the garment from more than one direction, keep bright sources out of the mirror’s reflected sightline, and approve the result with the actual mirrors, finishes and merchandise. A high color-rendering label or a target horizontal lux value alone cannot tell you whether a fitting room will feel flattering or whether a navy fabric will look the same on the sales floor.
A fitting room is a small space with an unusually demanding visual task. The shopper looks at a face, fabric texture and fit from several distances, often while turning. They may photograph the result or compare it with the same item under daylight. A ceiling spotlight that looks impressive in an empty rendering can create an unhelpful bright stripe down the forehead, a shadow under the chin and a distracting reflection in the mirror. This guide turns those risks into a testable brief for retail designers, contractors and buyers.
Start with the decision the customer is making
The goal is not simply to make the cubicle bright. The shopper needs to judge color, texture and silhouette with confidence. The retailer needs the experience to remain consistent across cabins and stores. The operations team needs fittings that can be cleaned, accessed and replaced without changing the appearance of one cabin relative to the next.
Write these tasks into the brief before selecting a fixture: seeing the garment from front and side; seeing facial features without deep shadows; checking seams and texture; looking into the mirror while standing at several positions; and moving safely between the fitting room and the sales floor. A lighting concept should also work when a door or curtain is partly open. That often changes spill light, reflections and the apparent background.
Recent retail-lighting discussion from the Illuminating Engineering Society highlights fitting rooms as experience-focused spaces where color appearance, controllability and the customer’s view matter. That is a useful design signal, not a substitute for a project mock-up. See the IES retail discussion.
Why a single downlight frequently disappoints
A downlight directly over the shopper is easy to draw on a reflected ceiling plan. It also sends much of its light onto the top of the head and shoulders. The face and the front of a hanging garment can receive less useful light than the floor. A narrow beam can exaggerate this imbalance; a bright aperture may be visible in the mirror.
That does not mean a downlight is always wrong. It can provide general light when its location, beam, shielding and other light layers are chosen together. The problem is treating it as the whole solution. If the main task is vertical—seeing a person and clothing in a mirror—measure and judge the vertical planes, not only a meter reading on the floor.
At the design stage, mark a likely standing zone on the floor and sketch eye level for a person looking into the mirror. Trace the reflected view to see whether a luminaire or its luminous surface becomes a bright spot in that view. Repeat the check at more than one standing position and height. Move the light, change its beam or add shielding before ordering a large batch.
Build a balanced light layer around the mirror
Soft, controlled light from both sides of the mirror, or from a carefully designed illuminated surround, can reduce hard facial shadows. The detail matters: a luminous strip that is too close to the eye or insufficiently diffused may itself become glaring. A linear source integrated into millwork should be tested with the final diffuser, recess depth, mirror edge and wall color. A paper layout does not reveal every reflection.
Ceiling light can provide background brightness and help the cubicle feel open. An accent fixture can emphasize fabric texture or a brand feature, provided the beam does not create a harsh hotspot on the person. The best balance depends on the size and reflectance of the cabin, the mirror angle and the retailer’s visual identity. There is no universal “one fitting-room luminaire” that can be copied unchanged from a large flagship cabin into a compact store.
Where the room has no built-in mirror lighting, a wider and well-shielded ceiling distribution may be preferable to a tight pool directly over the head. Where mirror lighting is used, reduce the ceiling accent rather than simply adding more light. The layers should complement each other.
Check color in the way customers actually compare it
Color rendering deserves attention, especially for clothing, skin tones and makeup. Yet no single label tells the whole story. CRI can be a useful starting specification; R9 and TM-30 can add information about saturated reds and the broader rendering pattern. Ask suppliers for comparable test information for the exact LED and driver configuration, not just a marketing claim. Our CRI, R9 and TM-30 guide explains the distinction.
Color temperature is equally context-dependent. The fitting room should not make the same garment look unexpectedly different from the adjacent sales floor. A dramatic difference between the two areas can make a customer question the purchase even if each space looks attractive on its own. Test representative whites, blacks, neutrals, saturated colors and skin tones. Include the retailer’s actual fabrics and finishes, not only a generic color chart.
Where tunable light or customer-selected scenes are proposed, decide what problem the feature solves. “Daylight,” “evening” and other labels can be useful only if the resulting light is credible and easy to understand. Establish a reliable default scene so the room works even when nobody touches a control. If a dimming scene is included, verify color appearance and flicker at the lower settings as well as at full output.
Control glare for the mirror, not just the ceiling
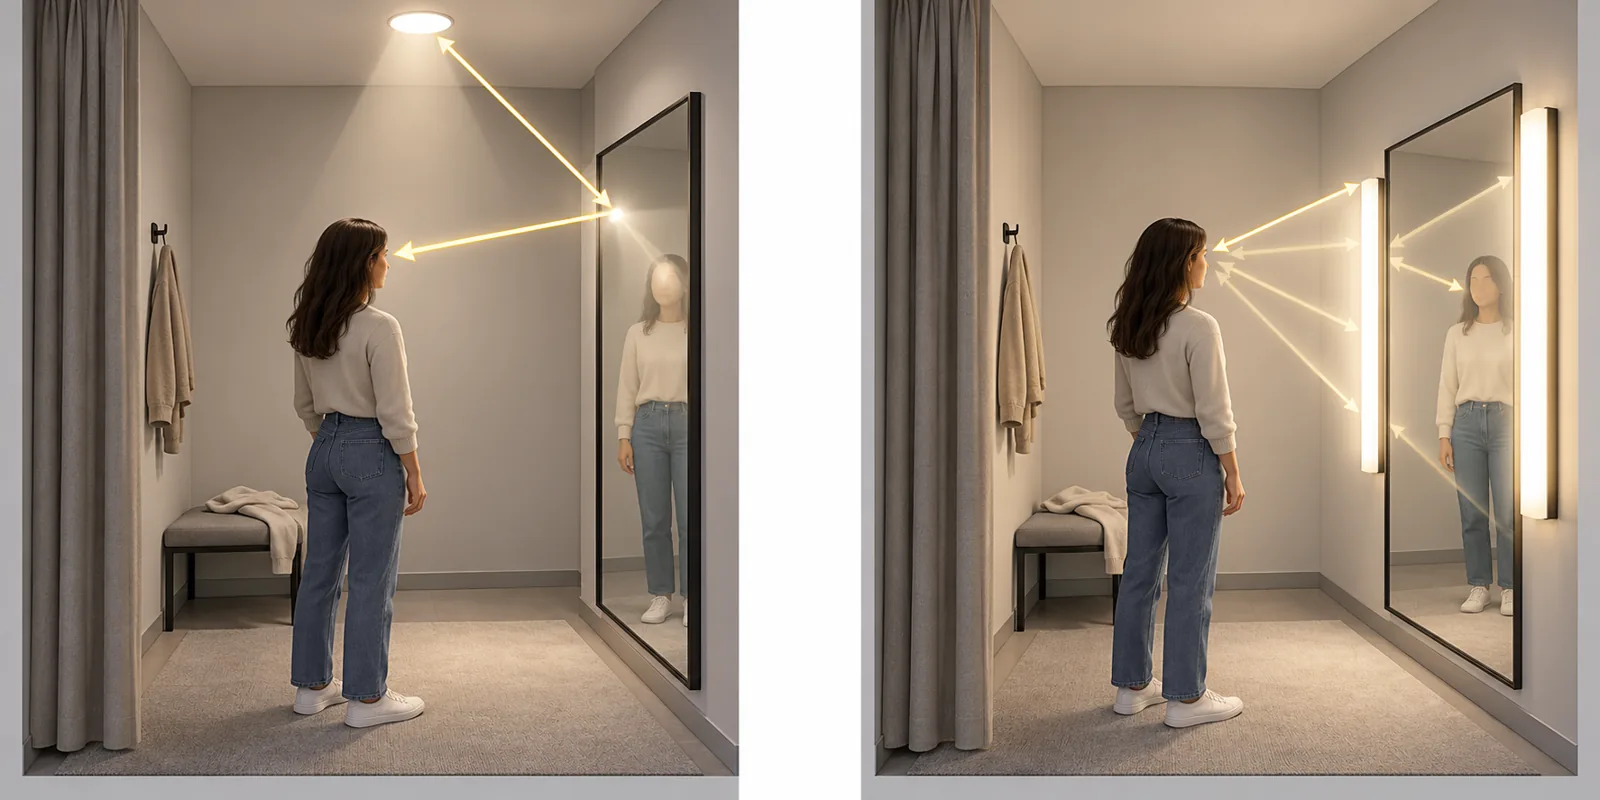
Glare can come from a directly visible source, a mirror reflection or a polished surface. These are different paths and require different fixes. A recessed aperture may be comfortable when viewed directly but distracting once reflected in a tall mirror. A side-mounted luminous strip may avoid a reflected ceiling hotspot but still sit in peripheral vision. Test both.
Check the mirror from the entrance, the center standing position and near each side. Look with the curtain or door open and closed. Photographing the mirror can reveal a bright source, but a photo alone is not a reliable glare measurement; review it in person too. Use adjustable aiming only when the final aiming angle will be recorded and maintained. Otherwise, a store team may change it later and recreate the glare problem.
If a track-mounted accent is considered, use the actual fixture geometry in the mock-up. A compact COB track spotlight can be evaluated for controllable accent light, while a selectable commercial downlight can be evaluated for general light. Neither linked product should be assumed suitable for a fitting room without checking the chosen beam, mounting, dimming option and appearance on site.
A mock-up sequence that prevents expensive rework
- Use the real geometry. Mock up one cabin with final or representative mirror size, wall color, ceiling height and door or curtain.
- Use the real merchandise. Test a small sample of fabrics the store actually sells, including difficult dark and saturated colors.
- Use real viewing positions. Ask people of different heights to stand, turn and step back.
- Compare spaces. Walk from sales floor to fitting room carrying the same garment.
- Test all scenes. Evaluate full output, dimmed conditions and any selectable color-temperature setting.
- Record the approved setup. Capture fixture position, beam, aiming, driver, control setting and finish for rollout.
Do not approve only a photograph of the empty room. The approval should describe what shoppers can see and whether the merchandising team accepts the garment appearance. A simple acceptance sheet reduces the risk that a later store receives a different LED board, diffuser or driver under the same informal product name.
What to ask a luminaire supplier before the rollout
| Question | Why it matters | Evidence to request |
|---|---|---|
| Which exact LED, optic and driver are in the sample? | Substitutions can change color, dimming or beam behavior. | Approved sample identifier and component schedule. |
| Can the fixture be aimed and then locked or documented? | Uncontrolled re-aiming changes the mirror view. | Aiming range and installation instructions. |
| What happens at low dimming levels? | Flicker or color shift may appear only in an evening scene. | Driver/control compatibility and a live dimming test. |
| How are replacement units matched? | One visibly different cabin can undermine a chain rollout. | Reorder and color-consistency process. |
| How are fittings serviced? | Maintenance must not damage millwork or mirrors. | Access method and replaceable-part information. |
For multi-site programs, capture not only the purchase specification but also the mock-up result and any field adjustments. Our retail lighting mock-up guide provides a broader acceptance approach that can be adapted to fitting rooms.
Common mistakes to catch before ordering
Specifying only horizontal illuminance: A floor reading is useful for circulation but does not prove that the face and garment are well lit. Check the vertical task surfaces and visual balance.
Choosing a CCT in isolation: A number on a data sheet cannot show how a specific fabric will compare between sales floor and fitting room. Compare adjacent spaces with the same sample.
Assuming a high CRI eliminates all color problems: The spectrum, dimming behavior, surrounding finishes and amount of light still influence appearance. Review actual merchandise and the exact final configuration.
Over-lighting the mirror: More light can increase reflected glare and wash out useful contrast. Adjust source size, placement and shielding before raising output.
Ignoring operations: A complex user scene that staff cannot reset, or a concealed driver that cannot be reached, may look good at handover but disappoint later. Keep control and service instructions simple.
Practical specification brief
A concise tender can state the desired shopper experience, the representative cabin dimensions, the required mock-up, merchandise used for acceptance, expected control scenes, and which substitutions need new approval. It can request beam and color information for the selected LED configuration, a drawing showing fixture locations relative to mirror and standing zone, and a maintenance path for the driver and optical parts.
Ask for a photometric file when it will support the project layout, but do not treat a simulated result as final proof of mirror comfort. Site finishes, reflections and human viewing positions can change the outcome. Set an acceptance step with the retailer and designer before a bulk order. For a commercial project, this is often cheaper than correcting every cabin after fit-out.
Frequently asked questions
Should fitting-room lights be warm or cool white?
Neither is automatically right. The chosen appearance should suit the retailer’s brand and keep garments reasonably consistent with the nearby sales floor. Compare real fabrics and faces in a mock-up before fixing the setting across stores.
Is one ceiling downlight enough?
It may give adequate general brightness in a small room, but it often leaves the face and front of the garment less evenly lit than desired. Test the mirror view and vertical surfaces before relying on it alone.
Can a track spotlight be used in a fitting room?
It can provide a controllable accent, but beam, shielding, reflected glare, mounting and aiming all matter. Test the exact fixture in the real cabin; do not assume that a spotlight suitable for a display wall will be comfortable in a mirror.
What color-rendering data should a buyer request?
Ask for the exact configuration’s color-rendering information, including CRI and, where relevant, R9 or TM-30. More importantly, approve representative merchandise and skin tones under the sample light in the finished setting.
What should be recorded after the mock-up?
Record fixture model, LED and driver version, optic, finish, installation position, aiming, controls and the accepted scenes. Those details help production and maintenance reproduce the approved result.
The illustrations in this article are design concepts, not photographs of a supplied LCB fitting-room installation. Product options and compliance requirements must be confirmed for the project location and order configuration.
