 跳到内容
跳到内容 
A retail aisle can meet a horizontal lux target and still make the merchandise look dull. The usual reason is simple: customers look at vertical shelf faces, while many early lighting layouts are judged mainly on the floor. A useful retail aisle lighting layout must therefore coordinate track position, luminaire spacing, beam distribution, mounting height, shelf geometry and aiming around the surfaces people actually see.
When we review a project, we do not begin by asking how many fittings can be placed on one track. We begin with the merchandise planes, the customer journey and the visual priorities. That approach helps buyers avoid dark upper shelves, bright floor stripes, glare at aisle ends and expensive site corrections.

Quick answer: how should retail aisle lighting be laid out?
Start with the vertical shelf planes, not a universal spacing rule. Position the track so each beam reaches the merchandise at a practical aiming angle, choose an optic that covers the required shelf width, and space luminaires so adjacent beams overlap without creating bright scallops. Verify the design with an IES or LDT calculation, then commission a sample aisle by measuring vertical lux at the top, middle and bottom shelves.
This is the short answer Google may extract, but it is only a starting point. The correct dimensions depend on the exact luminaire, mounting height, aisle width, shelf height, reflectances and target contrast.
Why floor lux can give the wrong answer
Horizontal illuminance is useful for circulation, cleaning and safety, but it does not describe how well customers see labels, colours and product texture on a vertical display. A layout can produce a bright central walkway while leaving the merchandise comparatively flat. It can also waste energy by sending the most intense part of the beam to the floor.
We recommend defining at least three groups of target planes before selecting quantities:
- Vertical merchandise planes: the front face of shelving, hanging garments, wall displays and end caps.
- Horizontal task planes: the walkway, counters, packing areas or lower display tables.
- Accent targets: promotional bays, signs, feature tables and seasonal displays that need controlled contrast.
The project brief should say which group is most important. A supermarket may value consistent label visibility across long shelf runs, while a fashion store may want more contrast and stronger modelling. There is no honest one-number lux prescription for every retail brand.
What vertical lux means in a retail aisle
Vertical illuminance is the amount of light arriving on an upright plane. For a shelf, imagine a measurement grid placed just in front of the product faces. Readings at eye level alone are not enough: upper and lower shelves may receive very different light because of beam angle, shelf projections and the customer’s body shadow.
For design and commissioning, we normally suggest a grid that includes the top, middle and lower parts of each important bay. Record average illuminance, minimum illuminance and the ratio between them. The exact acceptance limits should come from the client brief and applicable guidance, but the method should always reveal where the dark bands are.
Do not compare vertical readings taken at different distances from the shelf. Fix the sensor position and orientation, document the measurement height, and keep nearby luminaires in the same operating state. This turns a subjective complaint such as “the bottom shelf looks weak” into a problem that the designer and supplier can solve together.
Collect these inputs before drawing the track
| Input | Why it matters | What to record |
|---|---|---|
| Aisle and shelf geometry | Defines the target planes and aiming distance | Aisle width, shelf height, bay width, end-cap position and overhangs |
| Ceiling and track height | Changes beam size, intensity and glare exposure | Finished mounting height and any level changes |
| Track offset | Controls the aiming angle to the shelf | Distance from track centreline to merchandise plane |
| Luminaire photometry | Shows the actual distribution, not just a nominal beam angle | IES or LDT file for the exact wattage and optic |
| Surface reflectance | Affects brightness, contrast and calculated results | Ceiling, floor, shelf and wall finishes |
| Customer sightlines | Reveals direct and reflected glare risks | Entrances, aisle ends, queue points and common viewing directions |
| Merchandising plan | Determines the required emphasis and flexibility | Permanent bays, promotions, signs and seasonal changes |
If these inputs are missing, the supplier can only provide a concept. That distinction protects both parties: a concept helps compare options, while a construction-ready layout requires verified dimensions and product data.
Choose track position from the target backwards
A practical way to position a track is to start at the vertical shelf plane and trace the desired light direction back to the ceiling. The track should allow the luminaire to reach the upper and lower merchandise zones without extreme aiming. If the rail is too close to the shelf, the top may be over-lit while lower products remain shadowed. If it is too far into the aisle, the luminaire may sit in common sightlines and create glare.
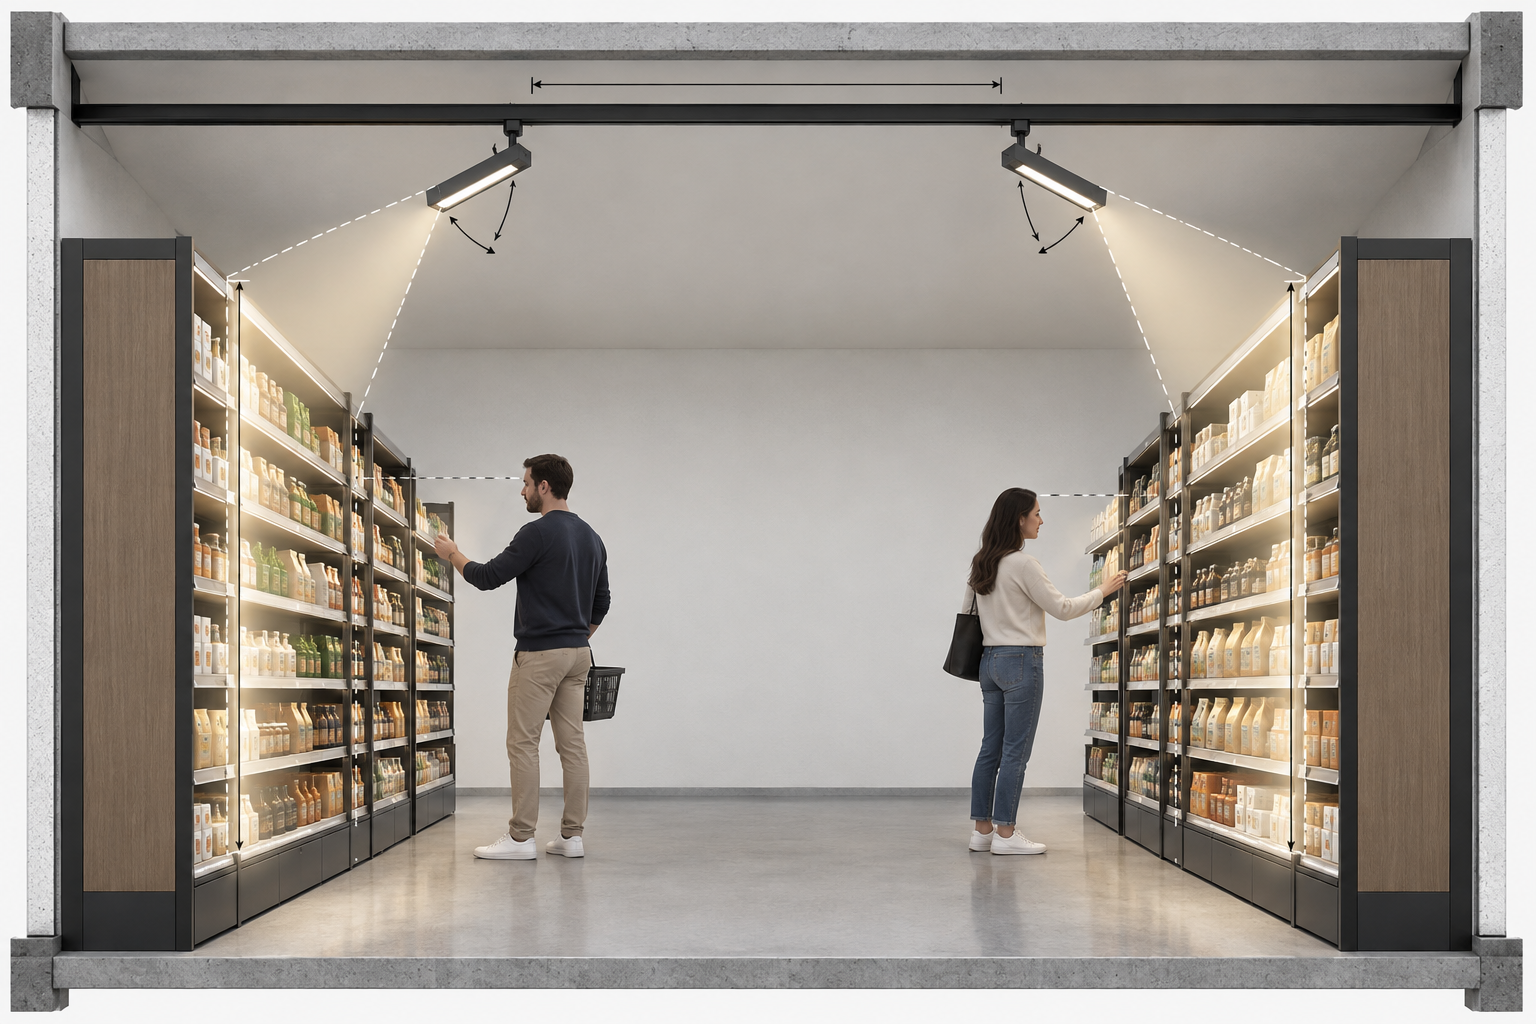
There is no fixed “best” offset because shelf height, ceiling height and beam shape vary. However, every proposal should show a section drawing. A plan view alone cannot prove that the beam reaches the bottom shelf or that the luminous aperture stays outside a shopper’s direct view.
For two-sided aisles, decide whether one central track can serve both sides or whether separate tracks are justified. A central rail can reduce ceiling clutter, but the fittings need suitable distribution and adjustment. Separate rails can make aiming easier and provide greater control, but add hardware and installation cost. We compare both as complete systems rather than assuming the option with fewer luminaires is automatically cheaper.
Set luminaire spacing by overlap, not by habit
Spacing should allow neighbouring distributions to overlap on the merchandise plane. Too much separation creates bright and dark bands. Excessive overlap wastes power and can flatten the visual hierarchy. Nominal beam angle is helpful for a first sketch, but it is not enough for final spacing because real distributions have different peak intensities, field angles and edge behaviour.
For a rough geometric check, the beam diameter on a plane can be estimated as:
Beam diameter ≈ 2 × throw distance × tan(beam angle ÷ 2)
Use this only to understand scale. A 60° beam from one product may not match another 60° beam, and an angled beam on a vertical shelf forms a stretched footprint rather than a perfect circle. The final answer should come from the exact photometric file. Our IES and LDT buyer’s guide explains what to request and why the correct product configuration matters.
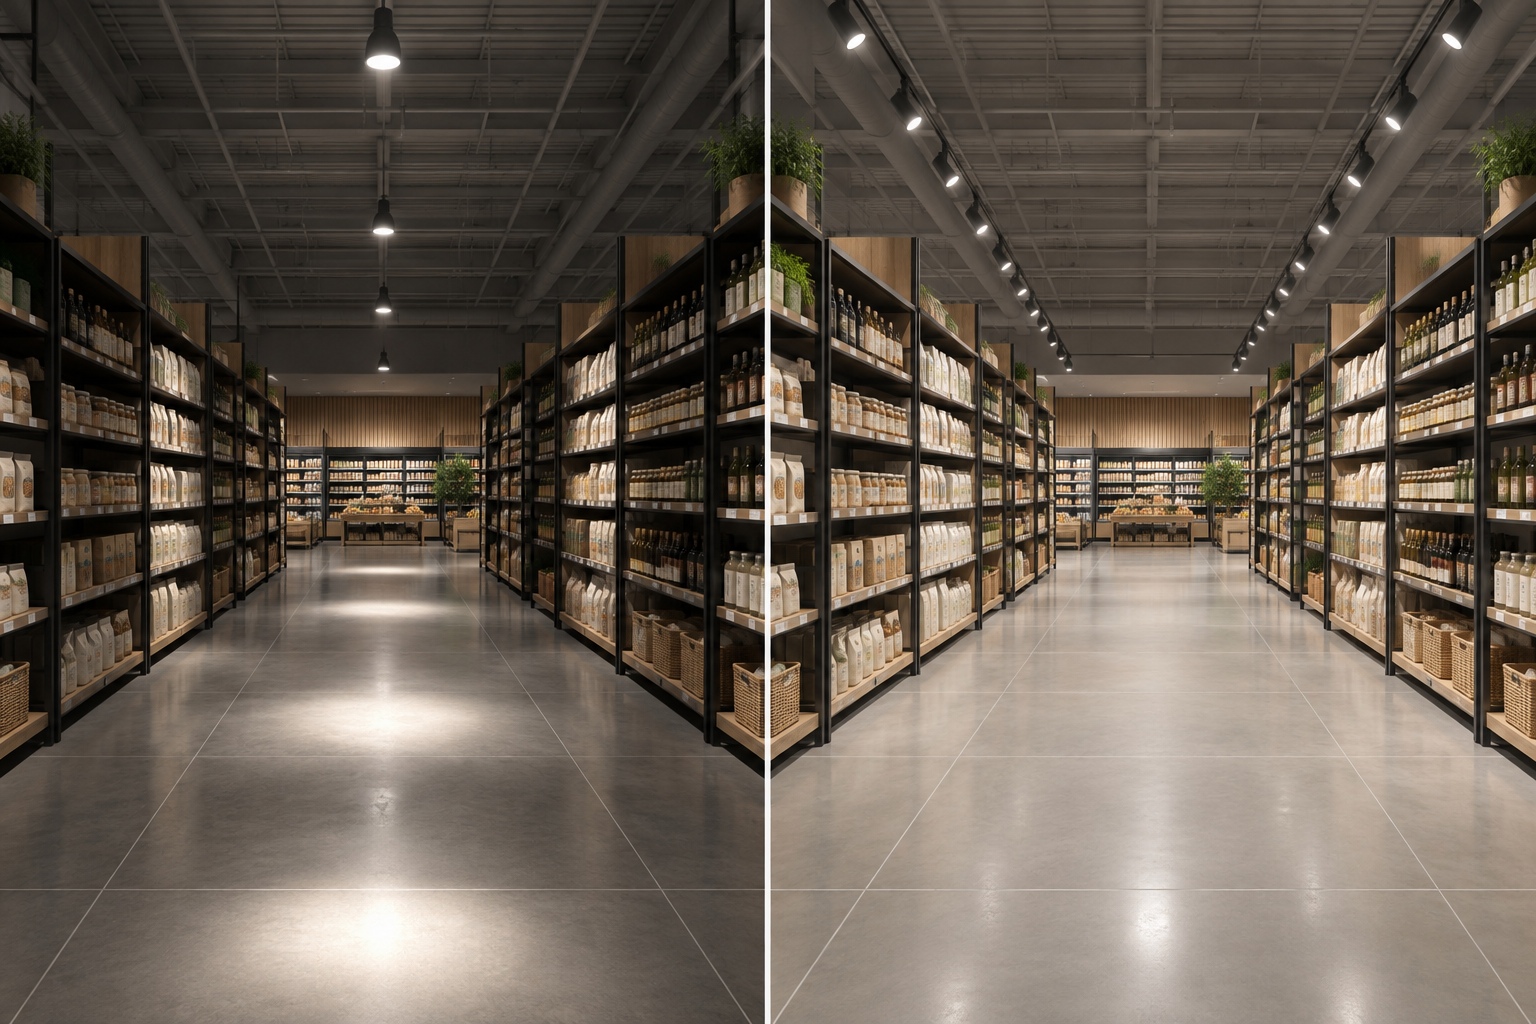
60° or 90° optics: which is more useful?
A narrower distribution can deliver stronger intensity at distance and reduce spill when it is aimed well. It may suit higher mounting positions, narrower target zones or layouts where a defined beam helps maintain contrast. The trade-off is a greater risk of scalloping and a more sensitive aiming process.
A wider distribution can blend more easily across long shelf faces and may tolerate modest merchandise changes. It can also send more light into the walkway or customer sightlines if the track position is poor. The right choice is therefore the optic that meets the vertical target with acceptable uniformity and visual comfort—not the optic that produces the largest lumen figure on a data sheet.
| Decision | 60° may help when | 90° may help when |
|---|---|---|
| Mounting and throw | The target is farther away or more defined | The mounting height is moderate and broad coverage is needed |
| Spacing | More careful overlap can be maintained | Smoother blending is the priority |
| Merchandising | Accent and contrast are important | Long uniform shelf runs dominate |
| Commissioning | Precise aiming can be controlled | Frequent layout changes require tolerance |
We recommend calculating both options at the same target condition. Comparing them at different wattages or different quantities can hide the real trade-off.
Where an adjustable dual-panel track light helps
An adjustable dual-panel fitting can divide its output between two targets. In a two-sided aisle, one panel may serve the left shelf and the other the right. In a perimeter zone, one panel can support a wall display while the other contributes to a feature table or circulation area. The benefit is not simply “more light”; it is the ability to assign each panel a clear job.
The LL1615 adjustable LED linear track light is available with 27 W, 40 W, 50 W and 60 W settings, 60° or 90° optics, CRI 80 or CRI 90 options and complete-luminaire output from 4,393 to 9,079 lumens. Those choices give a designer useful tools, but they do not replace a project calculation. Track compatibility, the exact adapter, panel aiming, mounting height and glare must still be confirmed for the real site.
When both panels are used for opposite shelves, check each aperture from both aisle entrances. Aiming that looks comfortable from the centre may expose a bright source to someone entering the aisle. Our guide to UGR, cut-off angle and glare control explains why a product-level glare claim cannot guarantee every installation.
A practical layout workflow
- Mark the target planes. Draw the real shelf faces, end caps, signs and feature zones.
- Set preliminary track lines. Use section drawings to find workable offsets and aiming angles.
- Select exact photometric files. Match the intended wattage, optic, CCT and accessories.
- Model vertical and horizontal grids. Include top, middle and lower shelf zones.
- Review uniformity and contrast. Find dark bands, hotspots and unintended spill.
- Check sightlines. Walk the virtual route from entrances, aisle ends and service positions.
- Compare alternatives fairly. Keep target light levels consistent when comparing optics or quantities.
- Build one representative mock-up. Use production-intent rail, adapter, fitting and merchandise.
- Measure and aim. Record vertical lux and the final panel or body positions.
- Freeze the approved configuration. Link the layout to the product code, optic, power setting and sample.
This workflow is slower than copying a spacing figure from a brochure, but it is much faster than correcting hundreds of fittings after installation.
How to commission the first aisle
Commissioning should happen after the shelving, signs and representative merchandise are installed. Start with one reference bay. Aim from the merchandise backwards, then walk the customer route before making small adjustments. Do not chase the highest meter reading at one point; look for useful coverage, visual balance and comfort.

Record readings at the agreed grid points and photograph the final aiming positions. If power is selectable, record the approved setting. Mark any different treatment for end caps or promotional bays. Our dual-panel sample approval and commissioning checklist can help the buyer, installer and supplier use the same acceptance record.
Common layout mistakes we help buyers avoid
Using one spacing ratio for every project
Spacing-to-height ratios can support an early concept, but they ignore the exact photometry, vertical target and aiming angle. Use them as a sense check, not an approval rule.
Putting the brightest light on the floor
A bright walkway can make weak shelves appear even darker by comparison. Evaluate the contrast between the merchandise and its background, not only the absolute floor value.
Calculating an empty room
Shelves, signs, refrigeration doors and products change the result. Model the major obstructions and use real reflectances where they matter.
Ignoring the aisle entrance
The worst glare often appears from an oblique view at the end of the aisle. Include observer positions and reflections from glass or polished packaging.
Changing the product after approval
A different driver, optic, diffuser, power setting or adapter can alter light output, distribution or mechanical fit. Freeze the approved configuration and repeat the relevant checks after a change.
What to include in the RFQ
Send the supplier a dimensioned plan and section, country, supply details, track brand and model, mounting height, aisle width, shelf height, target surfaces, desired CCT and CRI, control method, quantity estimate and required compliance documents. Ask for the IES or LDT file of the exact proposed configuration and identify which lumen value represents the complete luminaire.
Also explain how the store will change over time. If shelf heights and promotions move frequently, flexibility and easy recommissioning may be more valuable than a highly optimised fixed layout. We prefer to make that trade-off visible before quoting rather than sell a fitting that performs well only in one ideal arrangement.
Frequently asked questions
What is the best track-light spacing for retail aisles?
There is no universal best spacing. It depends on mounting height, track offset, beam distribution, aiming, shelf geometry and the required vertical illuminance. Use the exact photometric file and check beam overlap on the merchandise plane.
Should retail lighting be measured horizontally or vertically?
Both are useful, but vertical measurements are essential for shelves, wall displays and hanging garments. Horizontal floor lux alone cannot describe product visibility.
Where should the track be placed in an aisle?
Place it where the luminaires can reach the important shelf zones at practical angles without exposing bright apertures to common sightlines. Confirm the position with a section drawing and a site mock-up.
Is a wider beam always better for shelf uniformity?
No. A wider beam can blend smoothly, but it may also create spill and glare. Compare complete distributions and layouts at the same target condition.
Can one dual-panel fitting illuminate both sides of an aisle?
It may be able to, depending on aisle width, mounting height, output, optics and aiming limits. Calculate both shelf planes and test a representative installation before approval.
How many points should be measured on a shelf?
Use enough points to reveal top-to-bottom and bay-to-bay variation. At minimum, include upper, middle and lower zones across representative bays, then agree the exact grid and acceptance criteria with the project team.
Final recommendation
A reliable retail aisle lighting layout connects five things: target surfaces, track position, photometric distribution, shopper sightlines and site commissioning. If one is missing, a neat ceiling plan may still produce poor merchandise light.
If you send us your plan, section, shelf dimensions, track information and visual priorities, we can help narrow the optic and output options for a sample. Our aim is to give you a layout that can be checked and approved—not a generic spacing promise that moves the risk to the job site.

