 跳到内容
跳到内容 Are your retail clients complaining that their shelves are dark? It’s a huge frustration. You’ve installed bright lights, but the products on the middle and bottom shelves are still sitting in shadows, invisible and unsold.
The best way to fix dark shelves is to stop using standard spotlights and switch to an adjustable dual-panel linear light. This fixture mounts on a track but has two “wings” you can aim, washing the entire shelf—from top to bottom—with bright, even light.

Why Do Standard Spotlights Fail in Retail Aisles?
I’ve been in the LED manufacturing business for over 20 years, and this is one of the biggest problems I see retail contractors face. My friend Mike, who runs a lighting company in Germany, calls me about this constantly. He says, “Joe, my client’s spotlights are just making bright circles on the floor, and the products look dead.” He’s exactly right. The problem isn’t the amount of light; it’s the type and direction of the light. Let’s break down why your old solution isn’t working and what you can do about it.
Do you keep adding more track spotlights, but the shelves just seem to get brighter hotspots and darker shadows? This “hotspot” effect is a common trap. It looks unprofessional, wastes energy, and actually hides products.
Standard spotlights fail because they project a conical beam (a “cone” of light). This cone is designed to hit a single, small spot. It hits the top shelf brightly but leaves the middle and bottom shelves in deep shadow. This is called poor “uniformity,” and it’s terrible for sales.

Let’s get into the details. I see this mistake all the time. A contractor thinks, “The client wants it brighter, so I’ll use more power.” He’ll take a 30W or 40W track spot and aim it at the aisle. What happens?
The floor gets a blindingly bright circle. The top product on the shelf—say, a box of cereal—gets “blown out” with way too much light. If you take a light meter to it, it might read 1000 lux. But what about the products at a customer’s eye-level? They might only get 300 lux. And the bottom shelf? It’s a dark cave. You’d be lucky to get 50 lux.
The customer’s eye is naturally drawn to the brightest spot. In this case, that’s the floor or the single “hotspot” on the top shelf. They aren’t looking at the products you’re trying to sell. This is a total failure of light distribution.
I always use an analogy with my partners. A spotlight is a “hammer.” It is a tool designed to do one job: accent a single object, like a mannequin in a window, a piece of art, or a special display. It is not designed to wash a tall, flat, vertical surface like a 10-meter-long gondola shelf. When you use spotlights for aisle lighting, you are using a hammer to paint a wall. It’s the wrong tool for the job.
The “Scalloping” Problem
When you use multiple spotlights in a row, you get that ugly “scalloping” effect. This is the series of bright-dark-bright-dark curves along the top of the shelf. It looks cheap and unprofessional. It distracts the shopper. My clients in the UK and Australia, especially those outfitting high-end supermarkets and fashion retailers, are very sensitive to this. They want a clean, premium, even wash of light. Scalloping is an instant sign of an amateur lighting job.
Why More Power Doesn’t Help
The next idea installers often have is to just add more spotlights. So now you have twice as many fixtures. You have doubled your hardware cost. You have doubled your installation time. And you have doubled your client’s energy bill.
And what’s the result? The hotspots are hotter and the shadows are just as dark. You haven’t solved the core problem, which is uniformity. You have just thrown money and energy at it. This is where I tell my partners to stop and think about the shape of the light. You don’t need a “dot” of light. You need a “blade” of light. You need a light source that is rectangular, not round.
What is Vertical Illumination and Why Does it Really Matter?
Have you ever walked into a store that felt bright and open, even if the ceiling lights weren’t blinding? This is the magic of good vertical illumination. But your own light meter might say the floor is “bright” (500 lux), but the store still feels “dim” and your client is unhappy.
This is because you are measuring the wrong thing. Vertical illumination (or $E_v$) is the measure of light hitting a vertical surface, like a bookshelf. High vertical illumination is the real key to making products “pop,” helping customers read labels, and making the entire space feel brighter and more inviting.

For 20 years, many designers and contractors only focused on horizontal illumination ($E_h$). That’s the light hitting the floor. We all had to follow these rules: “Office floors need 500 lux,” or “Hallways need 150 lux.”
But I always ask my clients, “Who buys things off the floor?” Nobody. Your customer is looking at the products on the shelves. The shelves are vertical. This is why we must measure the light on the vertical plane.
I always ask my project partners, “What’s the vertical lux reading on the bottom shelf?” They often don’t have an answer. That, to me, is the most important metric. If you get that right, the store will be a success.
The Psychology of Bright Shelves
When a shelf is lit brightly and evenly from top to bottom, it does a few powerful things for the shopper:
- It feels welcoming: Dark aisles feel gloomy, cramped, and even a bit unsafe. A bright, open aisle invites the customer to walk down it.
- It makes products clear: The customer can easily read labels, compare colors, and see the texture of products. This reduces frustration and shortens the time it takes for them to make a purchase.
- It improves brand perception: A well-lit store feels more professional, cleaner, and higher quality. A supermarket with bright, colorful fruit and vegetables simply looks fresher than one with dark, shadowy bins.
The Numbers Game: $E_h$ vs. $E_v$
Let’s look at the numbers we aim for in a high-quality retail project, like the ones Mike does in Germany.
- Horizontal Illuminance ($E_h$) (Floor): You might aim for 300-500 lux. This is just for safe walking and general ambiance. It’s not the priority.
- Vertical Illuminance ($E_v$) (Shelves): This is the important one. You want a minimum of 150-200 lux, even on the bottom shelf. At eye-level, you should be aiming for 300-500 lux.
- Uniformity ($U_0$): This is the most critical part. It’s the ratio of the dimmest spot to the average. A uniformity of 0.4 ($U_0 \ge 0.4$) is considered good. 0.6 is excellent. Standard spotlights often give you a uniformity of 0.1 or 0.2, which is terrible.
Achieving good $E_v$ and high uniformity is physically impossible with standard spotlights. You need a light source that is designed to throw light sideways and downwards in a wide, rectangular pattern. This is why linear lighting systems were invented.
How Does an Adjustable Dual-Panel Light Solve This Problem?
You know you need to light both aisles, but a standard linear light is fixed. It wastes a lot of light on the floor. You feel stuck between a bad spotlight and an inflexible linear light. What if you could combine the best of both?
Our new adjustable dual-panel track light solves this problem perfectly. It mounts on a track for flexibility, but it has two angled “wings” (panels). You can aim each panel precisely at the shelf, washing the entire vertical surface with even, beautiful light and wasting zero light on the floor.

This light is something I am personally very proud of. We didn’t just invent this in a lab. We built it based on direct feedback from contractors like Mike.
Here’s what he told me: “Joe, I love the efficiency of your linear lights, but my installers hate being ‘stuck’ with a fixed position. What if the aisle moves?”
And then he said: “We all love the flexibility of track lights, but we hate the poor uniformity of spotlights. They look terrible.”
So, we combined them. This fixture clicks into any standard 3-circuit or 4-circuit track. You can place it anywhere. You can move it. But instead of one single light source, it has two rectangular panels. These panels are on high-quality hinges.
Total Control Over Light Direction
This is the key. You install the light on the track running down the center of the aisle.
- You angle the left panel to aim directly at the left shelf.
- You angle the right panel to aim directly at the right shelf.
The light distribution is asymmetrical. It’s designed to be in the middle and throw light to the sides. This is the complete opposite of a spotlight, which throws light straight down. You are not wasting any light on the floor. You are not creating a hotspot on the ceiling. 100% of the useful light is directed at the merchandise.
The result? Insanely good vertical illumination and uniformity. We have seen projects go from 50 lux on the bottom shelf (with old spotlights) to over 250 lux, just by swapping the fixtures. The client was amazed. The products, especially colorful packaging, just came to life.
A Quick Case Study
I remember a supermarket project we supplied in the Middle East. They had very tall shelving, almost 3 meters high. They were using old T8 fluorescent tubes. The top shelves were okay, but the bottom two shelves were a black hole. They wanted to switch to LED to save energy, but they were afraid the problem would get worse. They tested some LED track spots, and it was a complete disaster—just like I described before.
We sent them 10 samples of this new dual-panel light. The installer clicked them in, adjusted the wings in 30 seconds, and turned it on. The store manager’s jaw dropped. He literally said, “I can finally read the soup can labels on the bottom shelf.” They placed an order for the entire chain. That is the power of designing a light for a specific purpose. This fixture is a problem-solver.
What Key Features Should You Look for in Aisle Lighting?
You’re ready to buy. You place a huge order for 500 lights at 4000K. The lights arrive. Then, your client changes their mind. They want 3000K for the new wine section. Now you’re stuck with thousands of euros of useless inventory. This is a procurement officer’s nightmare.
Look for field-adjustable features. The two most important are CCT-switchable (to choose 3000K, 4000K, or 5000K on-site) and wattage-selectable (to adjust brightness). This gives you maximum flexibility, makes your client happy, and reduces your inventory risk to zero.
As a factory owner, I can make a light in any CCT or wattage you want. That’s easy for me. But I know that for my distributor partners, like Mike, holding inventory is his biggest cost and biggest risk. His main business pain isn’t lighting; it’s inventory management.
This is why we build “field-adjustable” products. They solve this exact inventory problem. Our dual-panel light was designed from the ground up to protect our partners.
Feature 1: CCT Selectable
CCT stands for Correlated Color Temperature. It’s the “color” of the white light.
- 3000K (Warm White): This is a cozy, yellowish light. It’s perfect for bakeries, wine aisles, or high-end fashion boutiques. It makes things feel warm and inviting.
- 4000K (Neutral White): This is the most common choice. It’s a clean, neutral white. It’s perfect for supermarkets, offices, and general retail. It makes colors look true and accurate.
- 5000K (Cool White): This is a very crisp, almost blueish light. It’s great for hardware stores, electronics sections, or clinics. It feels “high-tech” and very clean.
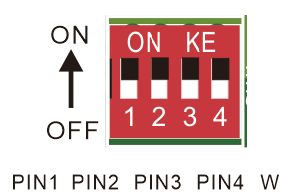
Our light has a small dip switch, as you can see in the photo. You can physically flip it to 3000K, 4000K, or 5000K right on the spot. This means one product SKU (Stock Keeping Unit) can be used for the entire store. You can use the same light in the bread aisle (at 3000K) and the cleaning supply aisle (at 5000K). This is maximum flexibility for the installer and minimum inventory risk for you.
Feature 2: Wattage Selectable
This is just as important. How bright is “bright enough”? It depends on the ceiling height. It also depends on the client’s preference. A 2.5-meter ceiling needs much less power than a 4-meter ceiling.
Instead of forcing you to guess and buy different-wattage lights, we put another switch on the fixture. You can select the power. For example, you can choose between 20W, 25W, or 30W.
This allows the installer to “tune” the brightness of the aisle perfectly. When they are on-site, if the hardware aisle needs more punch, they can flip it to 30W. If the baby food aisle feels too bright or “clinical,” they can dial it back to 20W. You get the perfect light level everywhere, all while using the exact same fixture.
This saves everyone time and money. And it makes you, the contractor, look like a true professional to your client. You are giving them a customized solution on the spot.
How Do You Calculate the Right Lighting for an Aisle?
You need to quote a new project. But you’re just guessing how many lights to use. You walk the aisle and think, “Maybe one every 2 meters?” If you guess too low, the shelves are dark and the client is unhappy. If you guess too high, your price is too high, and you lose the bid.
You need a DIALux simulation for a perfect, professional layout. But for a quick estimate, focus on vertical lux. A good rule is to place these dual-panel fixtures about 1.5 to 2.5 meters apart, depending on your ceiling height, to achieve an even 300-500 lux on the shelves.
I’m not going to give you a complex physics lesson. But I want to share the practical “rule of thumb” we’ve developed over 20 years of exporting to Europe.
The perfect way to do this is to use a lighting design software like DIALux. It’s a free program. We have a team of 5 engineers at Lowcarbon who do this all day. You send us the room dimensions (length, width, ceiling height) and the shelf height. We build a 3D model of the store. We then place our dual-panel lights in the software. The software then runs a simulation and creates a “false color” image. This image shows the exact lux levels on every single surface.
My clients in Europe, especially in Germany, require this. They won’t buy a single light without a DIALux report. It’s a sign of professionalism.
A Quick “On-Site” Estimation
But what if you are just on-site, walking with the client? You need a fast answer. You can’t wait 24 hours for a report.
Here is my practical advice:
- Check Ceiling Height: This is the most important factor. Let’s assume a typical supermarket ceiling height of 3.5 to 4.5 meters.
- Product Choice: You’ve selected the dual-panel track light. You set it to the highest wattage (e.g., 30W) and 4000K to start.
- Spacing: For a 4-meter ceiling, you will want to space the fixtures about 2 meters apart on the track. This will give you very even light. If the ceiling is lower (like 3 meters), you can space them further apart, maybe 2.5 meters. If the ceiling is higher (5 meters), you might need to space them closer, like 1.8 meters.
- The Goal: Your goal is to get the $E_v$ (vertical lux) on the middle shelf to around 400 lux. If you do that, the bottom shelf will likely be around 200-250 lux, which is excellent.
This table is a good starting point for our dual-panel light:
| Ceiling Height | Fixture Wattage | Recommended Spacing |
| 2.5m – 3.0m | 20W | 2.5m apart |
| 3.0m – 4.0m | 25W or 30W | 2.0m – 2.2m apart |
| 4.0m – 5.0m | 30W (High Output) | 1.8m apart |
My best advice? Don’t guess. As a Lowcarbon partner, you can just send me the plans or even a hand-drawn sketch. My team will run the DIALux report for you for free. You can then take this professional report to your client. It builds massive trust and shows you are an expert.
How Can Choosing the Right Factory Partner Save Your Project?
The new dual-panel light is perfect. You find a factory online that has a similar-looking product. You place a big order. Then the nightmare begins. The lights arrive 30 days late. Your installers are waiting. 5% are broken in the box. And the “white” color is slightly different from the sample you approved.
The product is only half the solution; the factory partner is the other half. A good partner saves you from these nightmares. They communicate clearly, maintain strict quality control (QC) on every batch, and deliver on time. This stops your main frustrations: project delays, angry clients, and products that fail after six months.
I’ll be direct. I’ve been in this business for two decades. I’ve heard all the horror stories from procurement officers like Mike. Their biggest pains have nothing to do with lumens or CCT. They have to do with people and process. These are the three main “pains” a bad supplier will give you.
Pain Point 1: Slow or Unclear Communication
You send an email with a critical technical question. You wait three days for a reply. The reply is in broken English and doesn’t even answer your question. Your project is now on hold. This is unacceptable.
At Lowcarbon, we operate on a “fast communication” principle. My sales team is trained to be fluent in English and to be product experts. When you ask a question, you get a clear, correct answer, fast. Often, you’ll just be talking directly to me on WhatsApp. We provide 1-on-1 factory support. We are your partner, not just a supplier.
Pain Point 2: Inconsistent Quality
You order 100 lights. The sample you received was perfect. But the 100-piece main order is different. The white color is slightly greenish (bad color binning, high SDCM). The drivers are a cheaper, no-name brand. And 10 of them are dead on arrival (DOA). This is a QC failure.
This is why we have 5 dedicated production lines. Our track light line only makes track lights. Our linear line only makes linear lights. The workers are specialists. We use the same high-quality LED chips (like OSRAM) and drivers (like Tridonic, BOKE, or Osram) for every single order. We have a 3-stage QC process:
- Incoming QC: We test all components before they go to the assembly line.
- During-Production QC: We check the lights during assembly.
- Aging Test: We run every single light for 24-hours before it goes in the box.This is how we ensure the 1000th light is identical to the 1st.
Pain Point 3: Delayed Shipments
Your supplier promised you a 30-day lead time. On day 29, you get an email: “Sorry, factory is busy, maybe 15 more days.” Your installer is scheduled. Your client is waiting. You look terrible.
We’ve been exporting to Europe, the UK, and the Middle East for over 20 years. We understand project timelines. Because we manage our 5 production lines efficiently, our delivery schedules are reliable. We don’t make promises we can’t keep. A reliable on-time delivery is the foundation of a long-term partnership.
Conclusion
Fixing dark shelves isn’t about using more lights; it’s about using the right light—an adjustable dual-panel fixture—from a reliable factory partner who understands your project needs.
