 跳到内容

Quick answer: Specify classroom lighting for the board, desks, teacher and screens as separate visual tasks. Place and aim luminaires so students can read the teaching surface without reflections or bright apertures in their view; zone lights near windows separately where useful daylight is available. Confirm the scheme in a representative room instead of assuming that one horizontal desk measurement proves the entire classroom works.
Classrooms are not static offices. A student may look at a notebook, a whiteboard, a projected image, a laptop and the teacher within a minute. Furniture may move for group work. Window light changes through the day, while the same room is sometimes used for cleaning or after-hours activities. This guide helps specifiers, schools and contractors turn those realities into a practical LED luminaire and controls brief. It does not replace local education, electrical or emergency-lighting requirements.
Draw the visual tasks before the ceiling grid
Start with the front teaching wall. Is the main surface a matte chalkboard, glossy whiteboard, interactive display or projection screen? Each responds differently to light. A whiteboard can reflect a bright source straight toward the back row. A projector screen may lose contrast if direct light falls onto it. A teacher’s face may be dark if only the desks are lit. These are reasons to review both horizontal and vertical light.
Mark typical student eye positions, including seats near the window and at the back. Note where the teacher stands while writing and where a student looks during a presentation. If desks move, do not optimize only for one perfect row arrangement. Record the tasks and viewpoints on a simple sketch that the supplier can understand.
The U.S. Department of Energy’s school lighting specification guidance discusses occupancy sensing and daylight-responsive control by space type. It is a helpful reference, but the design and legal requirements for a particular school depend on its location and project brief.
Light the board without washing out the screen
Think of the board as a vertical task surface. A luminaire aimed at desks may leave the board dim; a spotlight aimed directly at a glossy board can create a hard reflection. Separate board lighting from general classroom lighting if the teaching method needs it. Then test the board with real writing and from the rear and side seats.
For interactive displays, a bright luminaire reflected in the glass can obscure text. Shift the fixture position, beam or shielded view rather than simply dimming every light in the room. Check whether the teacher’s face remains visible when the display is in use. A useful “presentation” scene might lower the light near the screen while leaving circulation and note-taking areas adequate.
Projection screens add another layer: direct light onto the projected surface reduces image contrast. Coordinate screen position and projector before finalizing the luminaires. If the board and projection screen share a wall, document which mode is primary and how the control zones change between modes.
Give desks comfortable light, not just more light
Students need to see paper and keyboards without a row of bright source images in their line of sight. A broad, controlled distribution can support general lighting. A linkable LED linear system might be evaluated for an orderly ceiling layout; a grid-optic linear system might be evaluated where optical shielding and modular runs suit the project. These links show product families, not a claim that any listed configuration automatically meets school requirements.
Check the installed height, row orientation, desk positions and ceiling reflectance. A linear luminaire running parallel to a teaching wall may behave differently from a row perpendicular to it. Compare the actual distribution and photometric file rather than choosing only by wattage. Our UGR guide explains why a single glare number is not a universal promise of comfort in every room.
Glare should be judged from seated viewpoints and toward the normal visual targets, not from a standing position directly below the fitting. Also inspect bright windows: a well-shielded electric luminaire cannot by itself remove daylight glare on a display. Shading, screen location and electric lighting should be coordinated.
Separate daylight zones from interior zones
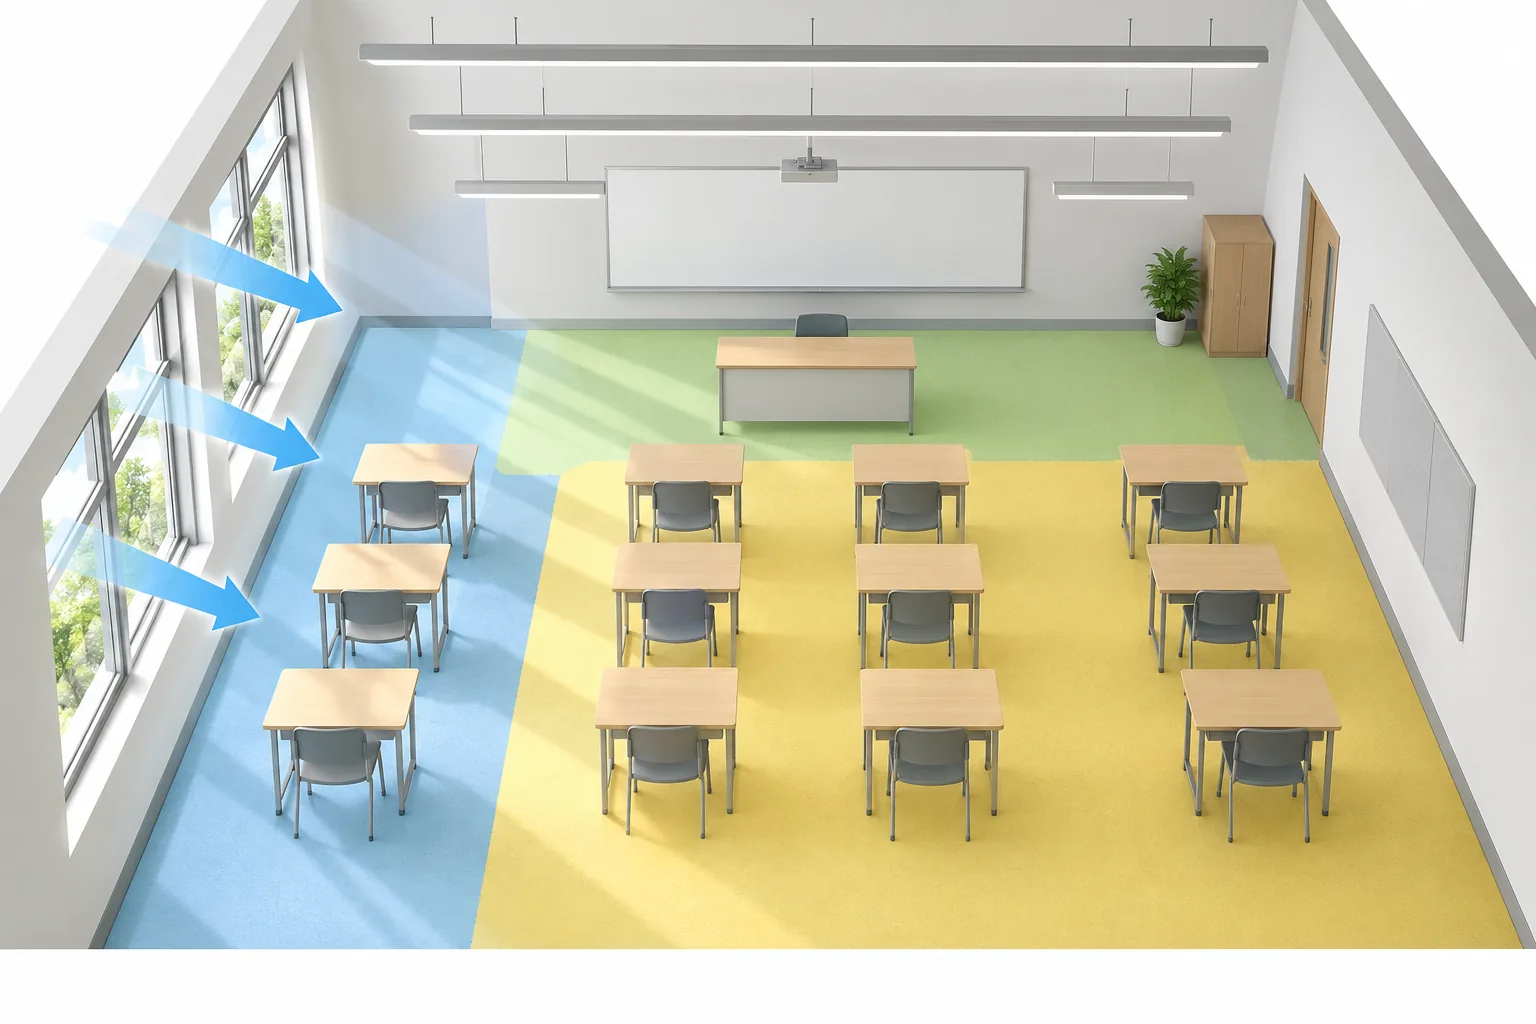
Students near windows may receive abundant daylight while interior desks need more electric light. If one control group serves the whole room, either the window side can be overlit or the interior can become too dark. Daylight-responsive zoning allows the electric lights near windows to change separately, subject to the sensor and control design. The goal is stable, useful light—not a visibly restless room that dims whenever a cloud passes.
The DOE LED and controls guidance describes daylight zones, sensor placement and commissioning pitfalls. Use it to frame the questions, then follow applicable local codes and the project engineer’s design. Place a sensor where it sees representative daylight, not where a projector, banner, cabinet or furniture change will block it.
Test the window-zone response during different daylight conditions. A room that is acceptable on a bright morning may be poor on a winter afternoon. Include a manual teacher control that is understandable and does not accidentally leave the class in a dark presentation scene. Commissioning should record the sensor location, target behavior and what staff may override.
Choose occupancy settings for teaching, not just savings
Occupancy sensors can switch or dim light when a room is empty, but some technologies may miss a seated student who moves very little. A sensor that turns off during quiet reading has failed the task, even if its energy report looks favorable. Test detection from the back corners and at desks, including group-work arrangements. Coordinate any automatic behavior with the school’s operation and safety rules.
DOE’s school guidance distinguishes occupancy mode, which can turn on automatically when presence is detected, from vacancy mode, in which a person turns on the lights and they turn off after the room becomes empty. It also notes differences between passive infrared and ultrasonic sensing. Do not select a sensor solely from a catalog heading; review the room geometry, line-of-sight obstructions, false triggers and the intended mode.
A teacher should be able to restore a suitable general-light scene quickly. Controls can be sophisticated behind the wall plate, but the front-end should be easy to use. Label board, presentation, general and cleaning scenes in terms that staff understand.
Check flicker, dimming and color across the full operating range
A classroom’s electric light may spend many hours dimmed by daylight control. Ask how the exact driver and control combination behaves below full output. Test for visible temporal effects, abrupt steps, buzzing and unreliable restart. If the project requests metrics such as PstLM or SVM, obtain measurements for the configured product and relevant operating conditions rather than applying an unsupported “flicker-free” label to an entire family.
Color consistency across rows matters because the ceiling is usually regular and differences stand out. Confirm the intended CCT and replacement-order process. Good color rendering can help teaching materials and faces look natural, but no single metric alone establishes an appropriate classroom environment. Test actual wall colors, materials and daylight conditions.
A control schedule should say what happens when an interactive display is used, when daylight is sufficient, when the room is unoccupied and during cleaning. Specify the expected transitions and manual overrides rather than only listing a protocol such as DALI or 0–10V.
Classroom mock-up and acceptance checklist
| Task | Test position | What to confirm |
|---|---|---|
| Board and teacher | Back and side seats | Writing and faces visible without a bright reflected source |
| Desks | Representative student seats | Paper and screens usable with comfortable source view |
| Presentation | All normal viewing positions | Display contrast and safe circulation in selected scene |
| Daylight response | Window and interior zones | Stable control behavior as daylight changes |
| Occupancy | Quiet seated student and empty room | No nuisance shut-off and intended automatic response |
| Service | Ceiling and access points | Driver and luminaire can be maintained safely |
Run the mock-up with real teaching materials and a powered display, not only an empty room. Record fixture model, optic, mounting, aiming if adjustable, driver, control zones and approved scenes. Where a sample differs from the proposed production version, repeat the relevant checks. The office linear worked example illustrates how a layout, glare and control-zone discussion can be structured, although classroom tasks need their own acceptance test.
Questions for the supplier and installer
- Can you provide the exact optic and photometric file for the quoted luminaire, not only a generic family file?
- What are the driver and control options for the approved configuration?
- How will the board, window and interior zones be wired or addressed?
- What happens if the sensor cannot see a seated student or if a display blocks daylight?
- How are failed drivers and light engines accessed, and how will replacements match existing rows?
- Who records the final scene settings and gives teachers a simple operating guide?
Require the project team to verify national and local requirements for schools, accessible operation, emergency systems and electrical installation. This article provides procurement questions, not an installation design or code-compliance claim. A qualified designer should resolve the final specification.
Plan for maintenance across the school calendar
Classroom lighting must remain usable after the installation team leaves. Ask who can adjust scenes when teaching methods change, where replacement drivers are stored, and whether a failed sensor leaves the lights in a practical state. If a classroom is refurbished during a short holiday, keep a simple record of fixture location, control zone, driver reference and commissioning settings. That record saves time when a replacement is needed years later.
For a phased school upgrade, test one representative room before committing the rest of the building. Include a morning lesson, an overcast afternoon, projected media and a board-heavy session. Staff should be able to demonstrate the controls without a contractor present. Record their comments alongside measurements and photographs taken from seated positions. A successful mock-up is not just a bright room; it is one where teachers can move between activities without glare, confusing controls or avoidable maintenance work.
Frequently asked questions
Is a desk-level lux target enough for a classroom?
No. Desk light is only one task. Board writing, teacher visibility, display reflections, student sightlines and daylight zones also need review. The appropriate numeric criteria come from the applicable project standards and professional design.
Should classroom lights be dimmable?
Dimming can support presentation and daylight-responsive scenes, but the driver, control and final scene settings must be compatible and tested. It is not useful if it introduces flicker or confusing operation.
Can the same linear luminaire light desks and a glossy whiteboard?
Possibly, but do not assume it. Review the board’s reflected sightlines from back and side seats. A separate board zone or different position may be needed.
What causes lights to switch off during quiet lessons?
A sensor may not detect a largely motionless person, or its location and timeout may be unsuitable. Test the actual occupied room and adjust technology, placement and settings with the designer.
What should be documented at handover?
Give the school the as-built luminaire schedule, control-zone map, sensor locations, approved scenes, operating instructions and maintenance/reorder details. Keep the instructions understandable to staff who were not part of commissioning.
Any classroom visuals accompanying this article are concept illustrations, not photographs of an LCB school project. Confirm the final product configuration and all local educational, electrical and accessibility requirements.
