 跳到内容

Daylight harvesting is often described as a simple way to save lighting energy: when daylight enters the room, electric lights dim. In practice, a good result depends less on the slogan than on zoning, sensor placement and commissioning. If a sensor sees a bright patch of sun while employees work in a darker area, it can dim the wrong luminaires. If all rows are grouped together, the interior desks may become uncomfortable just as the window seats have enough daylight.
For offices, classrooms and commercial spaces using LED linear lighting, the most useful starting point is a plan of the working areas and their daylight exposure. This guide turns that plan into a practical specification and mock-up checklist. It does not replace a project-specific design, local energy-code review or measured commissioning.
The featured office image is a concept illustration, not a photograph of an LCB installation.
What daylight harvesting actually controls
Daylight harvesting uses a photosensor and a control strategy to adjust electric lighting when available daylight contributes to the required illumination. A typical arrangement measures light in or near a zone, compares it with a target and dims the associated luminaires. The controller may also respond to occupancy, schedules or manual overrides. Exactly how it responds depends on the system and the project settings.
The U.S. Department of Energy’s LED lighting and controls guidance for federal buildings illustrates daylight-control zones and discusses sensor commissioning. Use it as a technical reference, then follow the project’s applicable local requirements.
The goal is not to make the window side as dark as possible. It is to maintain a useful visual environment while avoiding unnecessary electric output. The target needs to reflect the task and the way occupants use the room. A person viewing a screen may care about daylight glare and contrast, while another reading printed material may welcome more daylight. Electric-light control cannot substitute for blinds, shading, furniture placement or glare management.
Divide the space according to daylight exposure
Draw the windows, skylights, partitions and desk locations on a simple plan. Separate luminaires near daylight openings from those serving deeper interior positions. Depending on room depth and geometry, more than one window-side group may be appropriate. The divisions should reflect actual daylight distribution, not just equal strips drawn on paper. A south-facing glazed façade, a shaded north-facing window and an atrium edge can behave very differently.
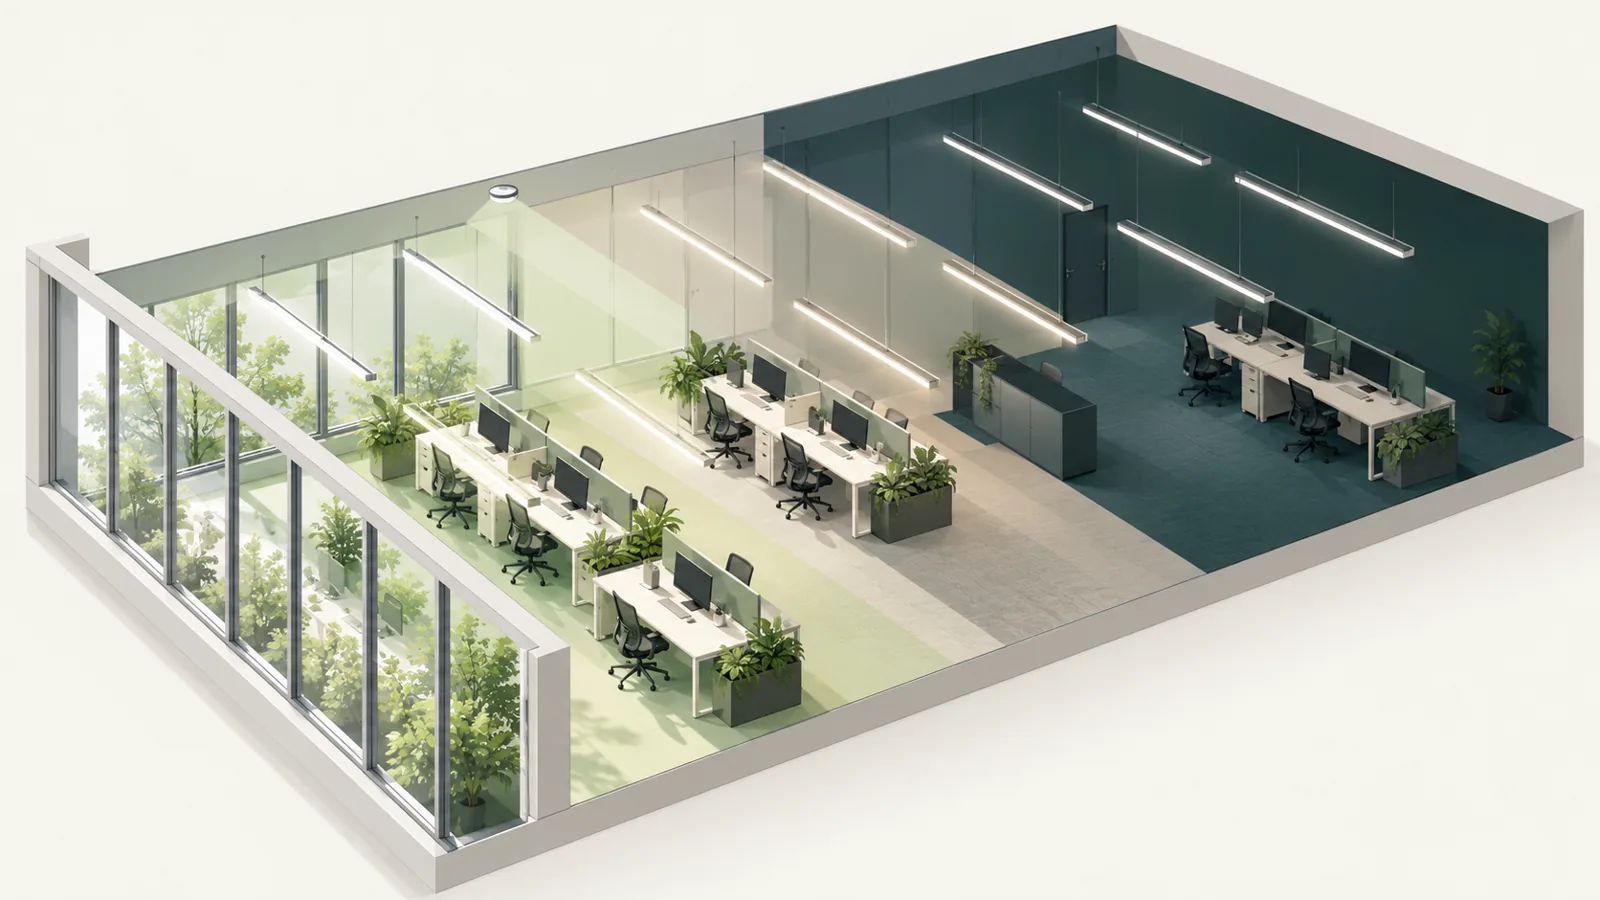
Where workstations can move, avoid making the zones so finely divided that the control map becomes fragile. Conversely, one large group across an entire open-plan office usually cannot respond well to both bright windows and dim interior desks. Document which luminaires are in each group, what task area they serve, and why. That record will matter when ceilings or furniture change.
Check for vertical surfaces too. A wall or meeting-room partition can block daylight from a desk even when the sensor sees the open window. The useful daylight at the task is what matters, not only the light falling on the sensor. For more general office planning, see our office linear lighting worked example.
Choose sensor positions by representative light
A sensor should see light conditions that correlate with the zone it controls. It should not be aimed directly at a window, a luminaire or a highly reflective surface unless the chosen control strategy explicitly requires that view. A bright tabletop sample, seasonal display or new partition can alter its reading. Ask the controls supplier for mounting guidance, then verify the proposed position on site with the actual interior finishes in place.
In a large open room, a single ceiling sensor may not describe the whole space. A mock-up or commissioning measurement can reveal whether it tracks the task areas well enough. If a sensor is moved, recalibrate the relationship between its reading and the desired occupied condition. Do not assume a factory default will suit every room. Also document the sensor location so a future ceiling repair does not leave it facing a different direction.
Select the control response occupants can live with
People notice abrupt, repeated light changes more than small, gradual ones. Decide how quickly the electric lights should dim or brighten and how much daylight variation the controller should tolerate before moving. The appropriate response depends on the space, available daylight, task and control platform. A system that is too sensitive may “hunt” when clouds pass; one that is too slow may leave a room temporarily underlit.
Define minimum and maximum output for each zone. Near-window fixtures should not dim so low that faces or vertical surfaces become dull when daylight is concentrated only on the floor. Interior fixtures may need to stay at a higher level. Review the dimming curve of the actual LED driver, because percentage command and perceived brightness are not necessarily the same. Test at full light, a typical daylight condition and the lowest expected occupied output.
Manual override is part of the user experience. Staff should know how to request more light for a task and whether the override resets automatically. Avoid a confusing collection of wall controls. If an occupancy system is present, coordinate its behaviour with daylight dimming so the two do not conflict. A room that suddenly darkens during a presentation or a quiet desk task will quickly persuade occupants to disable automation.
Coordinate electric light with glare and shading
Daylight is valuable but not always comfortable. Direct sun can create screen reflections, high contrast and excessive brightness at a window. Blinds or shades may be needed to manage it. Once shades close, the photosensor and controller should allow electric output to rise in the affected zone. Check the transition from open to closed shades during the mock-up.
Choose linear luminaires with appropriate optics for the mounting height and task. A luminaire that produces glare or a harsh bright line will remain uncomfortable even if a sensor reduces its output at certain times. Evaluate seated viewpoints, screens and vertical surfaces. If the scheme includes direct and indirect light, determine whether both components dim together or independently and how that affects the room’s appearance. Our glare guide for linear lighting buyers explains why one headline value cannot replace a room-level visual review.
Make the luminaire-driver-control interface explicit
The specification should identify the selected luminaire, driver and control method as one working system. “Dimmable” is not enough. Ask the supplier to state the interface, practical dimming range, behaviour after power loss and any limits on device count or wiring. If the design uses DALI, 0–10 V or another method, confirm compatibility with the controller and commissioning plan. Our dimming-method comparison gives background, but the site design still needs qualified controls review.
For a continuous office run, linkable LED linear lighting or recessed linear lighting can provide a consistent architectural line. The light-engine and optical choice should be made around the task; the control interface should then be specified and tested with the exact driver variant. If a later re-order uses a different driver, repeat critical dimming checks rather than assuming identical behaviour.
Commission the system under more than one sky condition
A one-hour check on a sunny day is not enough to show how daylight harvesting behaves. Review the space with shades open and closed, and if possible under bright and overcast conditions. Measure or observe task areas near windows and deep in the room. Walk through a typical occupied period: arrival, peak daylight, changing cloud cover and late afternoon. Check whether control movement is smooth and whether interior desks remain usable.
Record the settings, sensor positions, zone assignments and observed light levels. When measurements are made, note the conditions and instrument so the result can be repeated. Avoid stating a predicted saving as an achieved saving. Energy outcomes depend on occupancy, daylight availability, operating hours, control settings and baseline lighting power. If savings matter commercially, agree on a measurement method before making a claim.
Include users in the final check. Ask whether the scene feels stable and whether they can easily request a task-appropriate level. A technically functioning photosensor that staff repeatedly override is not a successful design. Our commissioning checklist helps structure the handover beyond daylight controls.
Five frequent mistakes
- One zone for the entire room: bright windows cause lights over interior desks to dim too far.
- Sensor looking at the wrong surface: its reading fails to represent actual occupied tasks.
- No shading strategy: daylight glare remains even while electric lighting is reduced.
- Untested low-end dimming: driver behaviour changes the appearance of continuous linear runs.
- No settings record: a later maintenance visit cannot reproduce the accepted result.
A specification checklist for buyers
Ask the design team to provide a daylight-zone diagram, luminaire schedule, control interface, sensor locations and target occupied scenes. Request an explanation of manual override and power-restoration behaviour. Identify who will commission the system, who will train staff and who will retain the configuration backup. Ask for the exact approved driver and luminaire variants, particularly when multiple branches or phases are planned.
Where the installation is an OEM or project-specific linear-lighting package, approve a physical sample with the intended control gear. Review the optical distribution, finish, joining detail and low-output behaviour together. A good daylight strategy relies on luminaires that remain visually consistent through the control range. Explore our commercial LED product families to shortlist potential fixture formats, then verify the project-specific control pairing.
Questions to resolve before the first occupied week
Ask the team to identify the person who will receive complaints and the settings they can change without undoing the approved design. If employees report that the window row feels too dim on an overcast day, compare their desk condition with the commissioning record before adjusting a sensor. A change to one control zone can affect adjacent desks and can obscure whether the real issue is shade position, furniture layout or a failed luminaire.
Schedule a short return visit after the space has been occupied in its normal pattern. Temporary mock-up furniture, empty desks and construction dust can make initial conditions unrepresentative. During the return visit, ask whether people override the system, whether screens reflect direct sun, and whether the electric light remains stable as clouds move. Record any changes and give facilities staff the updated settings. The initial handover and the occupied-space check together provide a much stronger basis for maintenance than a one-time “system passed” note.
Frequently asked questions
Will daylight harvesting always save a fixed percentage of energy?
No. Savings vary with windows, climate, shading, hours, occupancy, baseline power and control settings. Treat generic percentages as estimates, not measured results for your building.
Can one sensor control several rows of lights?
It can, but only if the sensor reading represents the task areas of all rows well enough. A daylight gradient often calls for separate near-window and interior groups.
Do daylight controls replace blinds?
No. Electric-light dimming cannot remove direct sun or screen reflections. Shading and lighting controls should be planned together.
What happens when clouds pass?
A well-set control should respond smoothly without distracting repeated changes. The response rate and thresholds must be commissioned for the room and tested with occupants.
Should controls be tested before ordering all fixtures?
Yes, particularly on a multi-room or multi-site project. A representative mock-up can reveal driver, sensor-placement and scene issues before they are repeated at scale.
If you are planning a commercial LED linear-lighting project, send LCB the reflected ceiling plan, window orientation, task layout and desired control method. We can help align luminaire options and OEM details with the daylight-control concept; the final controls design and code compliance should be verified by the project team.
