 跳到内容

A modular reflector LED downlight can make a product range easier to coordinate across rooms: a common ceiling language may accept different optical treatments for circulation, counters, displays and feature areas. That does not mean every module is interchangeable in every housing or that a reflector choice can be made from appearance alone. The delivered beam, glare, installation clearance and service method depend on the exact combination of light engine, optic, trim, driver and frame.
This buyer’s guide explains how to compare reflector and lens options within a proposed downlight family without losing control of the specification. It is intended for lighting brands, contractors and multi-site project teams. It does not claim universal beam angles, UGR results or cutout dimensions. Obtain the current documentation for each configuration and test a representative sample before committing to a rollout.
Start with applications, then build the module matrix
List the lighting tasks room by room. A corridor needs a coherent path and comfortable visibility. A retail counter may need stronger task light and good color appearance. A display niche might benefit from a tighter accent. A meeting area may favor a calmer, broader distribution. Assign each task a target surface and desired visual character before selecting optics. If the family cannot cover a task well, another luminaire type may be preferable to forcing one range into every location.
Make a matrix with location, ceiling height, target, required distribution, finish, CCT, control and maintenance access. Add the exact proposed product code for each variation. A manufacturer may describe a family as “modular” because several trims or reflectors are available, but the compatibility of those parts still needs to be verified. Ask whether optical modules can be changed after installation, whether a different driver is needed, and whether changing the reflector alters the external dimensions or cutout.
The matrix also helps avoid accidental substitutions. If two versions share the same outside housing but different inner optics, a busy installation crew can place them in the wrong rooms. A location code on drawings, cartons and the fixture itself is useful. One approved physical sample of each critical variation should remain available for comparison during production and installation.
What the reflector changes
The reflector and lens direct light from the source toward the intended area. A different optical combination may change beam width, spill, edge softness and aperture brightness even when the nominal power is unchanged. Therefore, total lumens or watts alone cannot tell the buyer how two versions will perform in a room. Request photometric information for the exact optic and review it against the application geometry.
A narrow distribution can emphasize an object but may leave uneven gaps when repeated for general lighting. A wide distribution may provide smoother coverage but put less emphasis on a small display. The right choice depends on mounting height, spacing, target dimensions and other lighting layers. A deep anti-glare accessory may change what occupants see when they look toward the ceiling, yet comfort still depends on viewing angle and room context. Test the installed configuration instead of assuming a component name guarantees the outcome.
When comparing an optic made with a reflector to one made with a lens, focus on the resulting distribution and quality, not on declaring one technology universally superior. Ask for beam plots or photometric files and look at the actual sample on a typical surface. Check whether color appearance changes with angle, whether the beam has unwanted rings and how the edge blends with adjacent fittings. These observations can matter as much as a headline efficiency figure in a premium interior.

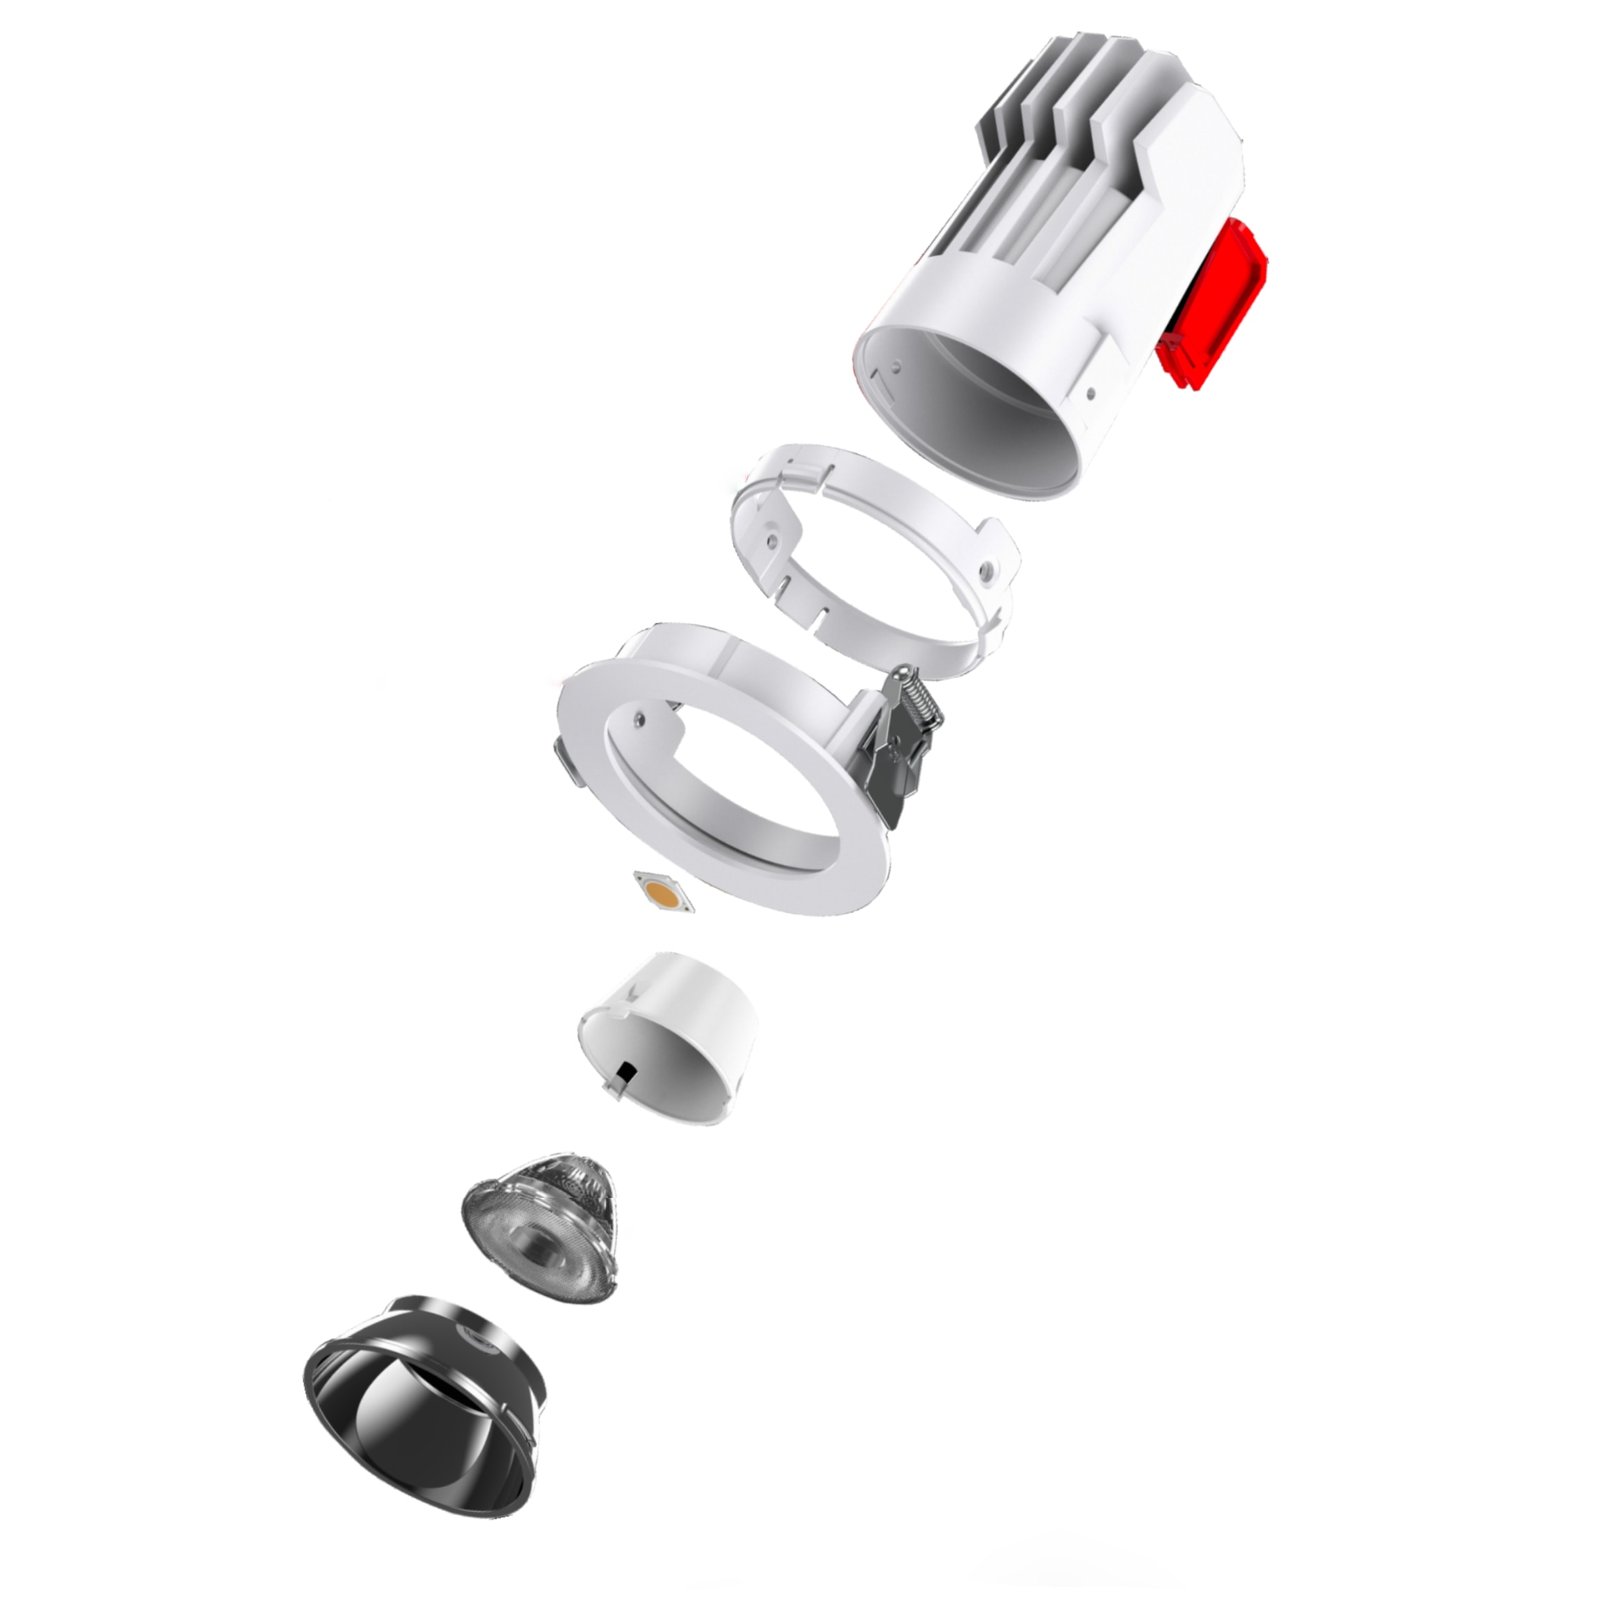
The cutaway is useful for discussing components, but only the supplier’s current compatibility table and model drawing establish which parts are approved together.
Keep the ceiling detail consistent
A modular range is attractive partly because it can preserve a consistent appearance across multiple spaces. Verify that the selected trims actually share the same visible dimensions and finish. A change in reflector depth or ring color can be obvious when fixtures appear in one sightline. Ask for physical finish samples and compare them under the actual ceiling lighting, not only on a computer monitor.
Check the opening before construction. Even products described as one family can have different cutout tolerances or installation depths. Confirm ceiling thickness, fixing arrangement, driver location, thermal clearance and service access for every selected variant. If a downlight is to be replaced in an existing opening, measure the real cutout rather than relying on a historical drawing. A pilot installation should show that the trim sits flush and that the optical module can be installed and removed as intended.
The relationship between the optic and the ceiling plane matters visually. A deeply recessed source may appear quieter than a flush bright diffuser from some viewpoints, but it may also produce a more defined pool. Do not trade the desired room appearance for a purely uniform fixture schedule. The project may need a few distinct versions, each deliberately placed, while still maintaining a coherent family resemblance.
Compare the options fairly
Set up a representative comparison with the same ceiling height, target surface and operating conditions. Avoid comparing one product at full power with another dimmed or changing wall colors between samples. Use the exact driver and optic intended for the order. Observe the surface illumination, beam edge, visible aperture, color and glare from normal positions. If photometric measurements are required, define the method and responsible party before testing.
For an office or hospitality project, check both the task plane and the faces or walls people see. A downlight may meet a horizontal target while leaving the room visually flat. For retail, the vertical display may be more important than the floor. In a corridor, repeated pools or gaps can become obvious. Evaluate the whole pattern, including the first and last fittings, not just a single sample in isolation.
Simulation can help narrow candidates, but it must use the exact luminaire file and documented assumptions. Real surface reflectance, daylight, furniture and installation tolerances can change the appearance. Save the simulation version and compare it with the mock-up. If the selected optic changes during procurement, the design should be reviewed again rather than accepting a “similar” component without evidence.
Electrical and control consistency
A modular optical family may share a light engine and driver across configurations, or it may not. Confirm the driver model, power setting, input range, dimming interface and compatibility for every variation. If one area requires a different power level or control protocol, document it clearly. A label reading “dimmable” does not prove smooth operation with the building’s controller; test the actual combination.
Check what happens at the intended low light level, particularly where accent and ambient scenes are mixed. Inconsistent minimum output across two visually similar fittings can be conspicuous. If the project uses emergency or other special-purpose lighting, involve the qualified designer to specify compliant equipment and circuits. A modular commercial downlight page should not be treated as project approval for such systems.
For chain sites, keep a master schedule and a site-specific deviation log. A replacement should match not only the frame but also optic, driver, CCT and programmed setting. Ask the supplier whether the spare module is identified by a stable code and whether revisions are traceable. That information can prevent an apparently minor service replacement from changing the light pattern in a finished room.
A lineup photograph can aid identification; the approved optical schedule should still control what goes into each location.
Build a sample approval package
The package should start with a drawing of each configuration, including external dimensions, cutout, trim, driver and cable. Add the matching photometric file, finish reference, optic part number and installation instructions. If the product is promoted as field-changeable, request an actual demonstration of the change. Confirm whether the operation needs a tool, whether it can be done from below and whether it affects the warranty or safety approval. Do not assume easy exchange from an exploded graphic alone.
Install samples in a representative ceiling bay with the real or similar target materials. Compare the available optics at the same operating level. Note glare from entrances and seats. Photograph the accepted combinations, but write down what each image represents; automatic camera exposure can conceal differences. Sign off the final schedule, not merely the generic family name. The factory quotation and purchase order should repeat the same codes.
During production, ask how the supplier verifies the correct optic, driver and trim are packed together. A simple carton label and configuration check can matter as much as an end-of-line electrical test. If the approved parts are unavailable, the supplier should request a formal substitution approval before shipping. Lowcarbon’s product center gives a broader overview of downlight and other commercial ranges; use it to shortlist, then request model-specific evidence.
When a modular approach is not the best fit
A common downlight family can simplify visual coordination and spare stock, but it should not become a rule that overrides the lighting task. A wall-washing requirement may call for a genuinely asymmetric optic. A frequently moved retail display may be better served by track. A very shallow void may rule out the preferred recessed module. A high space may require a different mounting format. Use the application matrix to identify these exceptions early rather than disguising them under one product name.
The buyer should also compare life-cycle practicality. If the “modular” system uses proprietary parts that cannot be sourced later, the apparent simplicity of one family may be temporary. Ask about replacement availability, documentation and compatibility across revisions. A well-structured multi-product schedule can be more robust than an over-stretched single-family plan.
Common mistakes to avoid
- Selecting an optic from the appearance of its reflector instead of the target distribution.
- Assuming all modules in a family fit one cutout or driver.
- Comparing watts or total lumens without matching installation conditions.
- Failing to label optics separately on plans and cartons.
- Calling a dark baffle “glare-free” without a viewpoint review.
- Approving one family sample when several materially different configurations will be supplied.
- Changing a reflector after simulation without reviewing the design.
- Treating a physically compatible replacement as visually equivalent.
Frequently asked questions
Can a reflector be changed after installation?
Only if the exact product is designed and documented for that procedure. Check the current installation instructions and test the change on a sample, including access and safety requirements.
Do two optics with the same wattage light a room the same way?
No. The optics can distribute light very differently. Compare their photometric files and installed appearance on the actual target surfaces.
Does a modular range guarantee one ceiling cutout?
No. Verify the cutout and depth for every configuration. Similar-looking frames may have different requirements, especially across head counts or revisions.
Is a deep anti-glare reflector always better?
It can reduce visible source brightness in some views, but suitability depends on the target, distribution and room geometry. Inspect a sample from normal occupant positions.
What should the purchase order identify?
List the exact housing, trim, optic, light engine, driver, CCT, control option, finish and revision for each location type, with a reference to the approved sample and drawing.
Final recommendation
Use modular reflector downlights to create a coherent, serviceable family only after each optic is matched to a real lighting task. Verify component compatibility, installation dimensions and controls; compare samples under common conditions; and record the accepted configuration so it can be reproduced through production and maintenance.
